| Version 5 (modified by , 13 years ago) ( diff ) |
|---|
Table of Contents
- Introduction
- Step 1: Finding a web host in your country or region
- Step 2: Buying a membership from a web host
- Step 3: Understanding the web hosting environment
- Step 4: Downloading the iPeer binary file from sourceforge.net
- Step 5: Uploading the iPeer files to the web hosting server (using …
- Step 6: Configuring the database(s) on the web host’s server
- Step 7: Installing your iPeer instance on the web host
- Step 8: Referring to existing iPeer documentation to learn how to use …
How-To Guide for hosting iPeer on a website
Introduction
The purpose of this page is to guide you through the process of installing iPeer on a web hosting service of your choice. For our installation demo, we chose to use www.justhost.com as our hosting service as an example.
This guide involves the following steps:
- Finding a web host in your country or region
- Buying a membership from a web host
- Understanding the web hosting environment
- Downloading the iPeer binary file from sourceforge.net
- Uploading the iPeer binary file to the web host’s servers (using FileZilla or other similar software)
- Configuring the database(s) on the web host’s servers
- Installing your iPeer instance on the web host
- Referring to existing iPeer documentation to learn how to use iPeer.
Step 1: Finding a web host in your country or region
You can use a search engine like Google (www.google.com) or Yahoo (www.yahoo.com) to search for web hosts in your country or region. Decide on the criteria you will use to select a web host if you are spoilt for choice. Personally, we used the following criteria to find the best web host for our iPeer installation:
- Reviews of Service – read blogs and customer reviews to highlight the hosting services that have the most satisfied customers. Opt for hosting services that have high ratings, like “4 out of 5” or “9 out of 10”. The happier the customers are, the better the service and the greater the benefits for you!
- Reliability – look for hosting services that are dependable and don’t break down frequently. Also, make sure that the hosting service provides back-up servers in case of power outages. You can check by calling the customer service representative for the hosting company and having a talk with him/her.
- Cost – try and find a hosting service that meets your needs without breaking the bank. Web hosting does not have to be expensive. Be mindful of the costs involved in choosing any hosting service and if in doubt, use price comparison tools online.
- Type of hosting environment – we opted for a shared hosting environment (as opposed to dedicated, reseller or VPS) because shared hosting generally tends to be the cheapest option.
- Location – make sure that your hosting service stores the student data on local servers (and not international servers). This is essential to ensure privacy of students` results. In our case, we needed to find a Canadian hosting service that could store all the student data in Canada (and not in the USA) because we did not want to be in breach of the Freedom of Information and Protection of Privacy Act (FIPPA).
If you are unable to find any suitable hosting services that match your requirements, you can always work with the following services:
| Country or Region | First Choice | OR select one from: |
|---|---|---|
| Canada or USA | http://www.justhost.com/ | http://www.webhostingyes.com/ |
| Australia | http://www.ezywebhosting.com/ | http://au.webhostdir.com/awards/ |
| New Zealand | http://www.greengeeks.com/ | http://webhostingreviews4u.com/web-hosting-new-zealand.html |
| UK | http://www.rackspace.com/ | http://uk.tophosts.com/top25-web-hosts.html |
| Europe | http://www.040hosting.eu/ | http://www.consumer-rankings.com/hosting/ |
Step 2: Buying a membership from a web host
In our case, at the Centre, we opted for a trial membership (we bought ours from www.justhost.com) for 1 month with a revolving contract. This meant that the membership stays valid as long as we pay the membership fee each month. We recommend that you buy a monthly membership, rather than a yearly membership, so that you can ensure that the hosting service provides the minimum requirements needed to host iPeer. These requirements are:
- PHP 4.2 or above
- PHP Dom module (for Teammaker)
- PHP GD module
- Apache 1.3 or above
- MySQL 4.x or above
Once you’ve tested the iPeer installation on your host, you can extend your membership to as long a period as you’d like to use iPeer.
Step 3: Understanding the web hosting environment
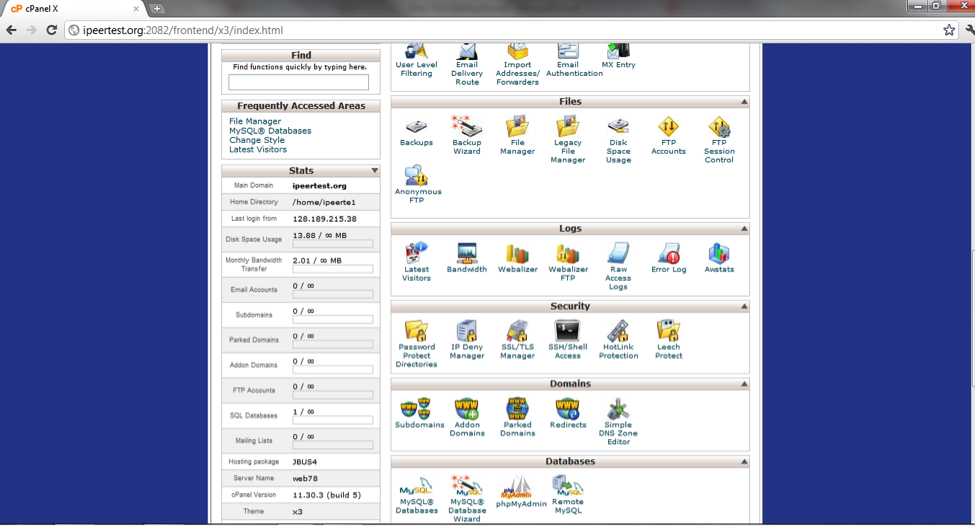
It is important that you familiarise yourself with your web hosting environment. Most hosting services should be able to provide a developer view (at www.justhost.com they provide customers with a cPanel). This view contains all the important icons and features that you will need to install iPeer. We recommend that you find the following key icons/features in your hosting environment:
- Key stats – these reveal names of your main domain and home directory, the disk space usage and the IP address from which you last logged into the website
- File Manager (found under Files in www.justhost.com) – this feature is used to manage all the iPeer data files that are stored on the hosting service’s servers.
- MySQL Databases (found under Databases in www.justhost.com) – this feature is used to create and configure the database that will be used by the iPeer application.
- Logs – these contain records of site traffic (like Latest Visitors and Awstats) and site maintenance (like the Error Log) and are useful for monitoring purposes.
These key features can be seen in the screenshot below:
Step 4: Downloading the iPeer binary file from sourceforge.net
Take the following steps to transfer the iPeer files to your workstation:
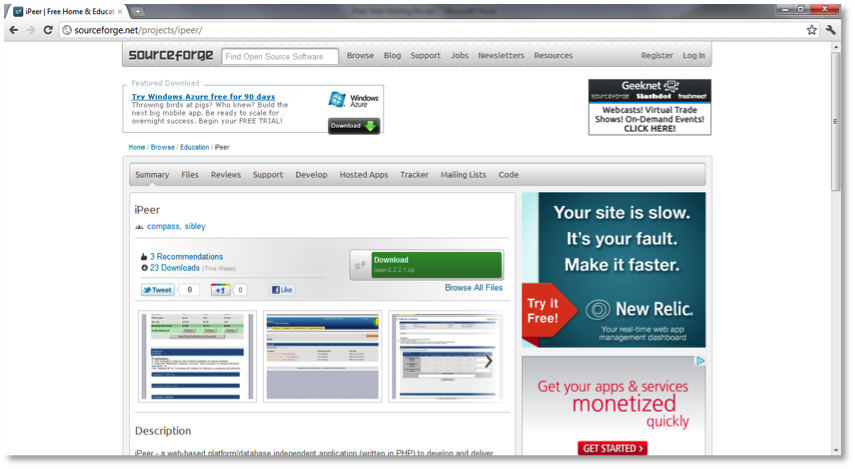
- Go to download or http://sourceforge.net/projects/ipeer/
- Click on Download button that is highlighted in green. See the screenshot below:
- Once the files have been downloaded to your hard drive, you will need to unzip the folder.
- The folder will be named ipeer-X.X.X
- The next step is to move this folder and its contents to the servers of the web host.
Step 5: Uploading the iPeer files to the web hosting server (using FileZilla or other similar software)
First, you will need to download FileZilla (or other similar file management software) from the Internet and install it on your workstation. Since we used FileZilla, the steps to install it are as follows:
- Go to http://filezilla-project.org/
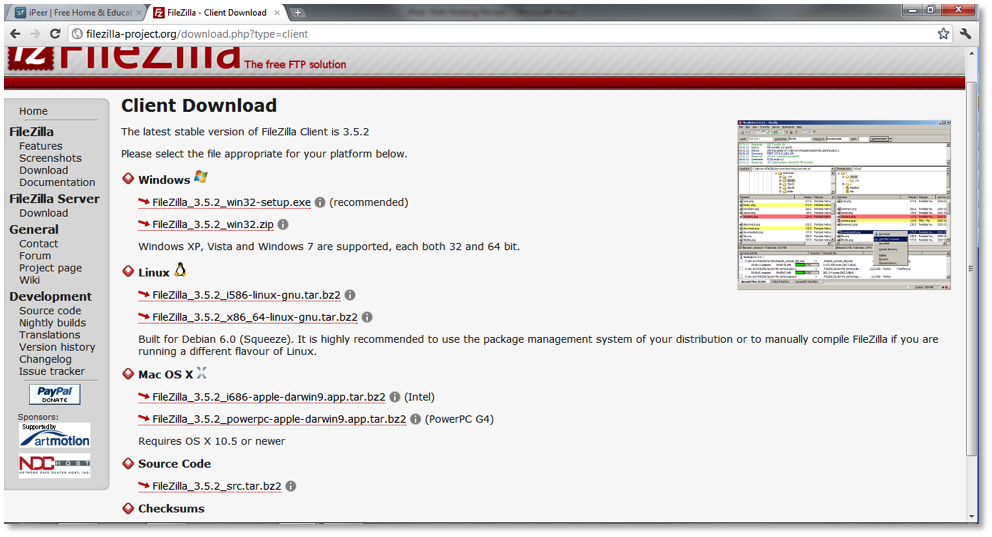
- Click on the “Download FileZilla Client – All platforms” button. See the screenshot below:
- Select the Operating System/platform you use on your workstation. See the screenshot below:
- If you’re unsure about the Operating System you are using, select “FileZilla_x.x.x_win32-setup.exe”.
- Once the file has downloaded to your hard drive, run it and install FileZilla on your workstation.
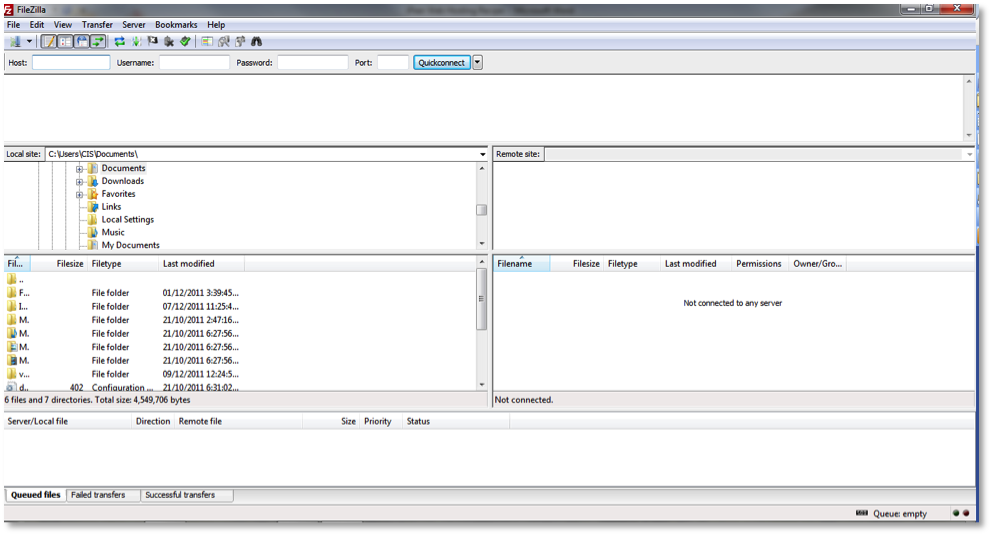
- Now open FileZilla. You will see a screen like the one below:
- You will need to enter the Host, Username, Password and Port number (use Port Number 21 for FTP, 80 for HTTP and 443 for HTTPS). We, at the Centre, used Port Number 21 as FileZilla is a FTP client. The host name, username and password are all provided to you when you buy a membership from the hosting service. Once all the information is entered, click the Quickconnect button. The next time you need to transfer files, FileZilla will remember this connection and you can find it by using the drop down arrow on the Quickconnect button.
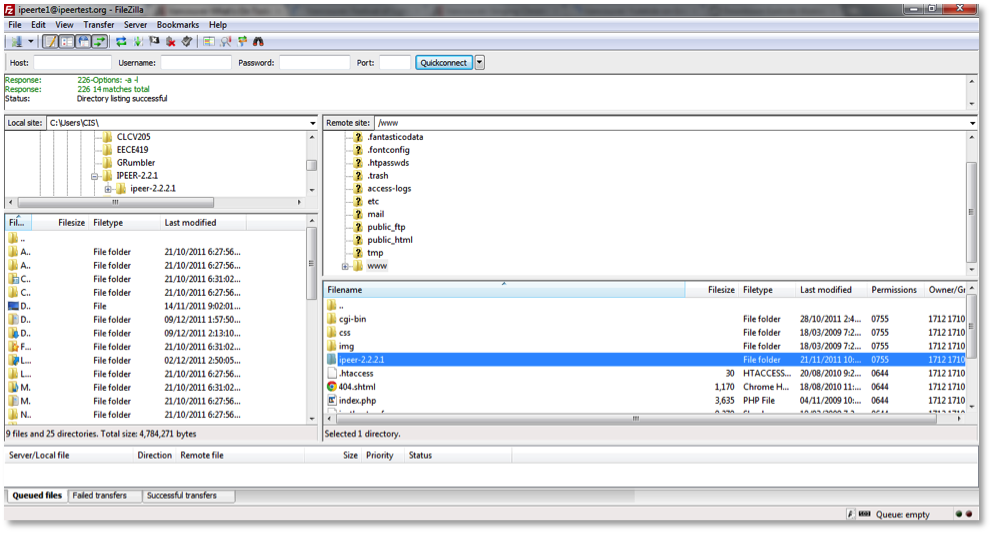
- Once you’re connected to your hosting service’s servers, you will need to locate the ipeer-x.x.x.x folder (that you saved from sourceforge.net) within the local site i.e. your workstation. To do this, you need to find the folder on the left hand side of the screen.
- Once you’ve found it, you need to drag and drop that folder into the remote site. We dropped the ipeer-x.x.x.x folder into the www folder (located within the root-/ directory) and this can be found on the right hand side of the screen. See the screenshot below:
- Now that the ipeer-x.x.x.x folder has been move to the “/www” directory, you will need to configure the databases on the web host.
Step 6: Configuring the database(s) on the web host’s server
The steps to do this are as follows:
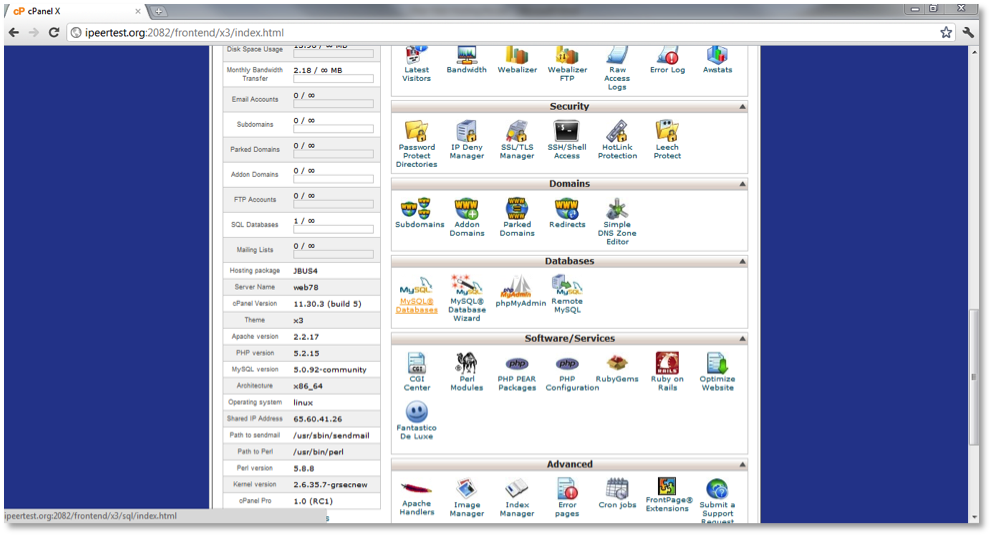
- Log into your web host’s homepage or into your domain’s website. Select the MySQL databases icon. We used www.justhost.com and our homepage looks like this:
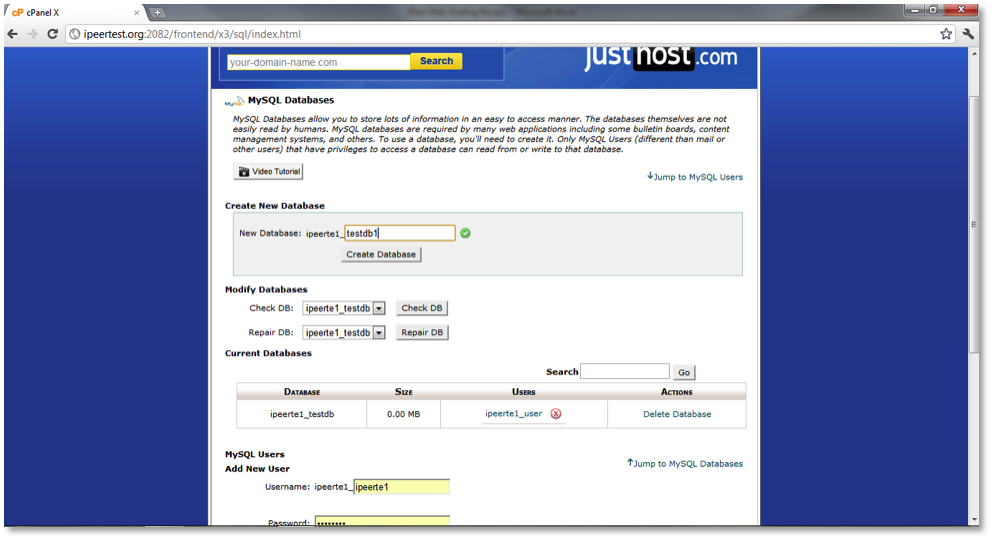
- Next, create a new database. We have called ours “testdb1”. See the screenshot below:
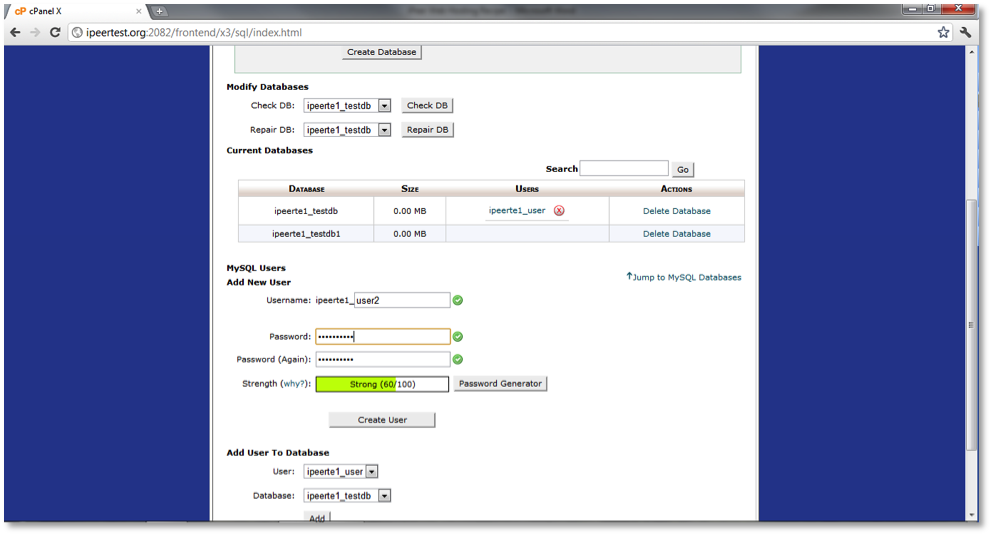
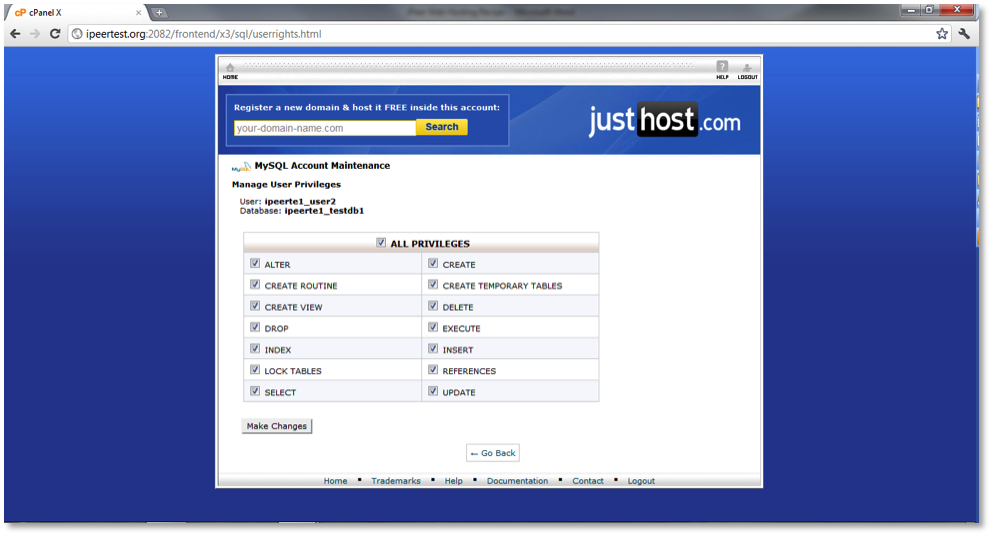
- Next, create a new user for the database. We have called ours “user2”. Now add this user to your new database. You should give this user “All” privileges. See the screenshots below:
- Once the new user has been created and added to the database, you can install the iPeer application.
Step 7: Installing your iPeer instance on the web host
Take the following steps to install iPeer:
- Type your URL/file directory/ipeer-x.x.x.x/install into your web browser.
- For our web host, we typed in www.ipeertest.org/ipeer-x.x.x.x/install (This information is confidential).
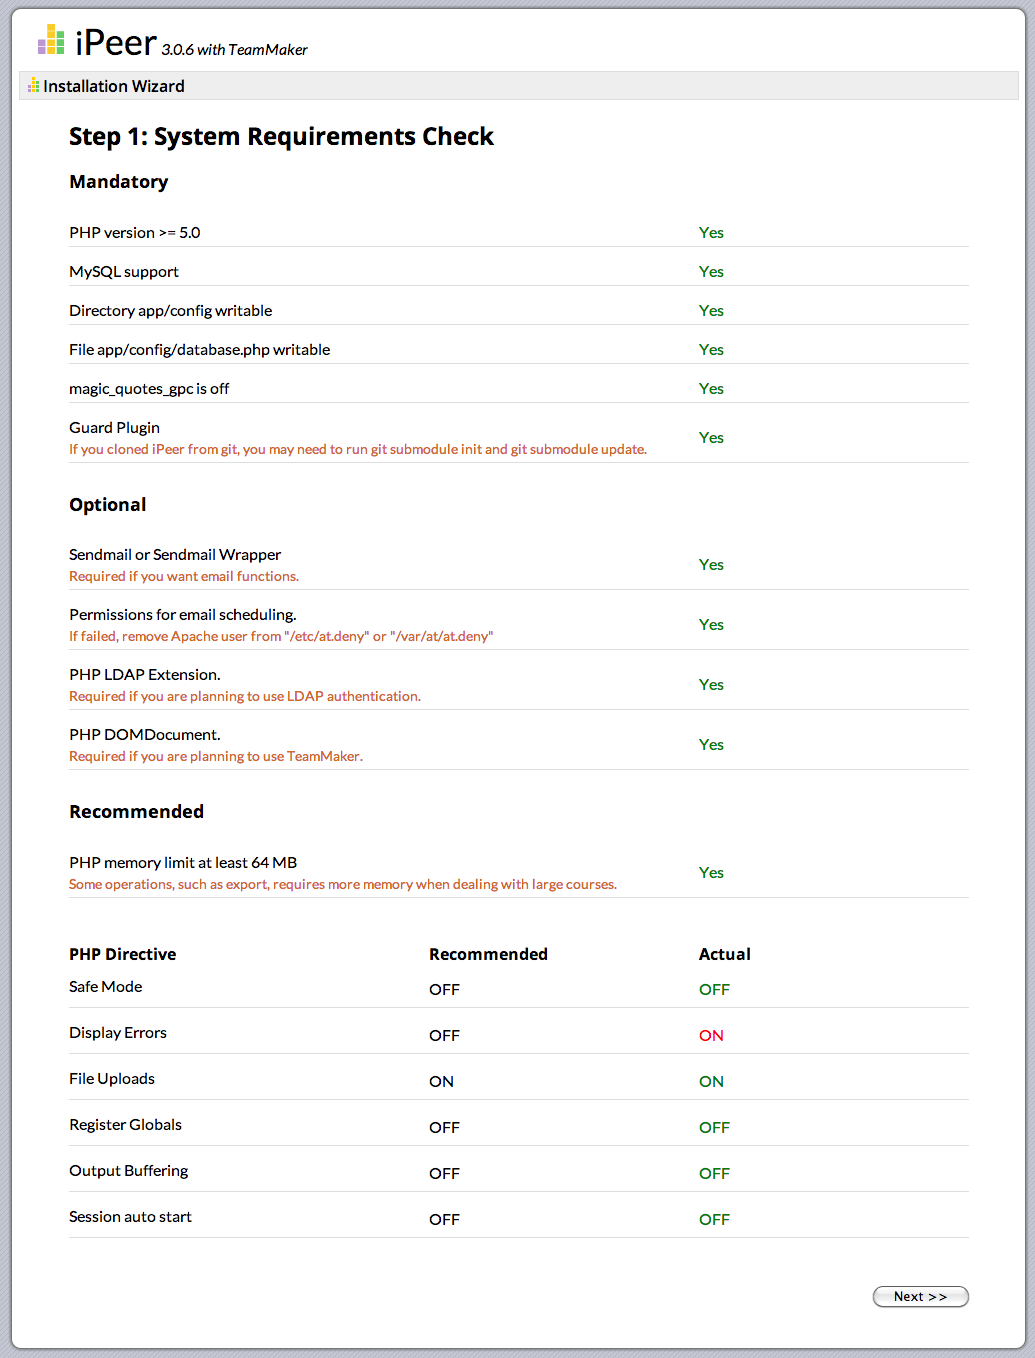
- You should see a screen that looks like:
- You need to click Next if all the settings in the right hand column are green. That means that the system requirements are satisfied for iPeer’s installation.
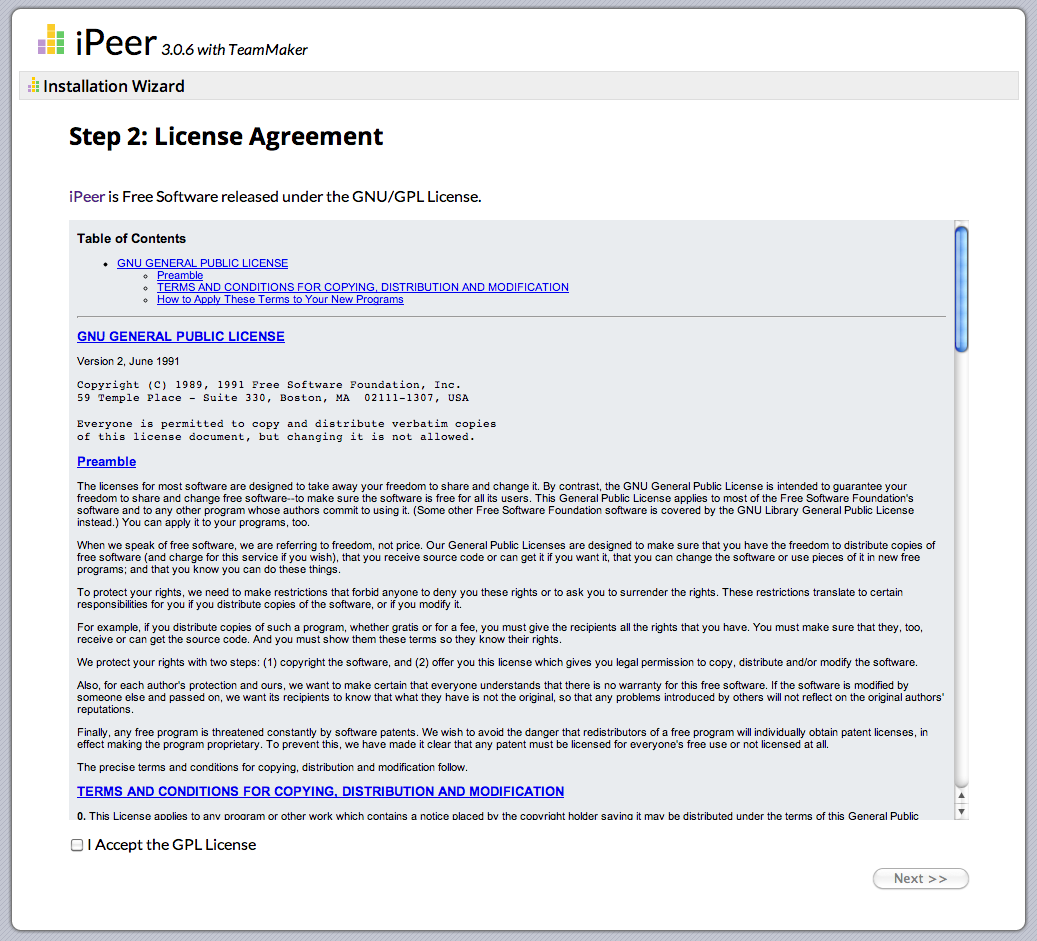
- The next step is to accept the GNU/GPL License Agreement. You have to tick the checkbox that says “I accept the GPL License” and click Next. See the screenshot below:
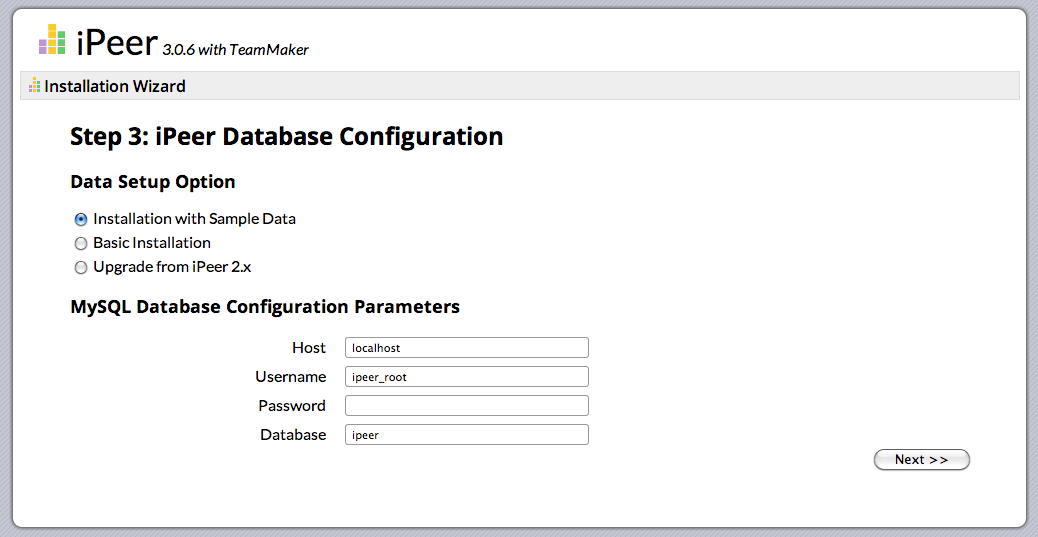
- You now need to manually configure the database properties based on the database and user(s) you created in Step 6. See the screenshot below. You should select “Installation with sample data” as this option uses the pre-loaded data for testing the application. Once you’ve listed the configuration parameters then click Next.
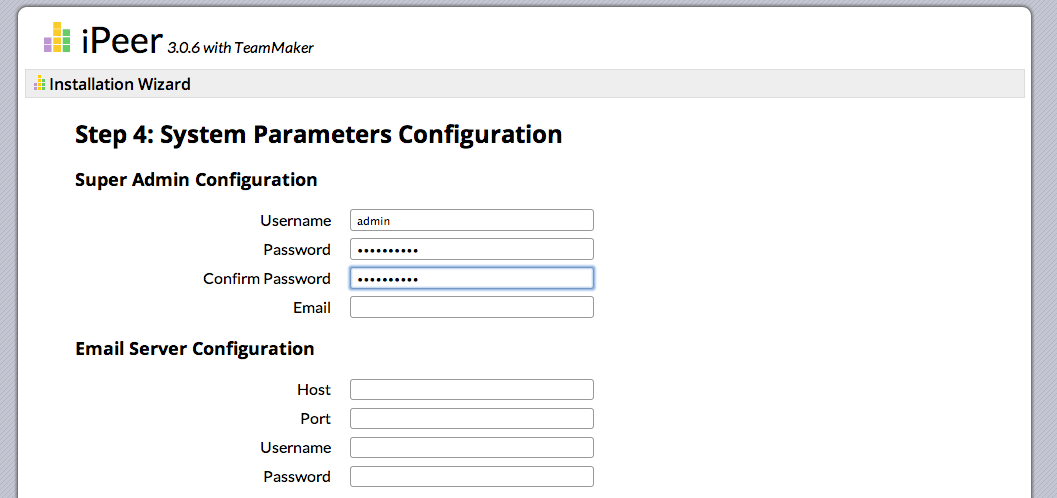
- You now need to set the iPeer System Configuration Parameters. See the screenshot below for more details. Once you’ve entered the parameters, click “Install iPeer”. For our installation, we set the following (confidential) parameters: Domain: ipeertest.org, Super Administrator Username: root and Super Administrator Password: ipeer. The rest of the parameters were the default ones, as given by the system.
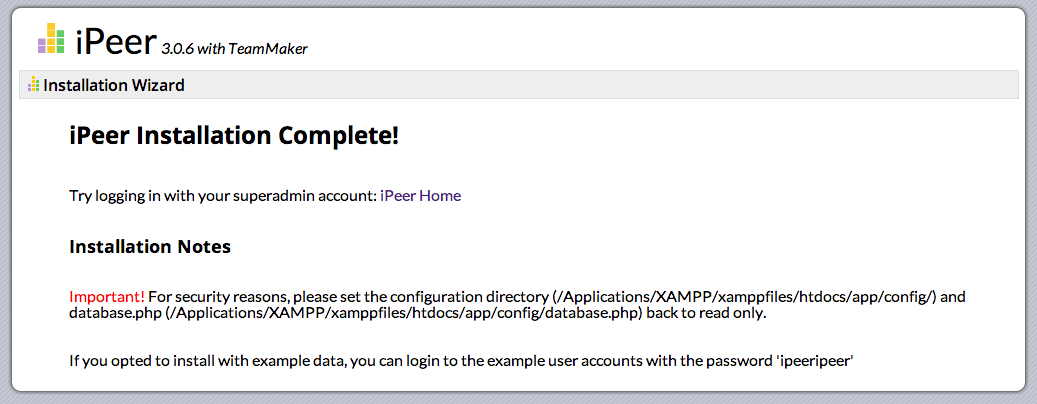
- Now you have successfully installed iPeer on your web host and you should see a screen that looks like this:
- Now, when you go to use iPeer, you need to use the Super Administrator Username and Password that you just specified in the last few steps.
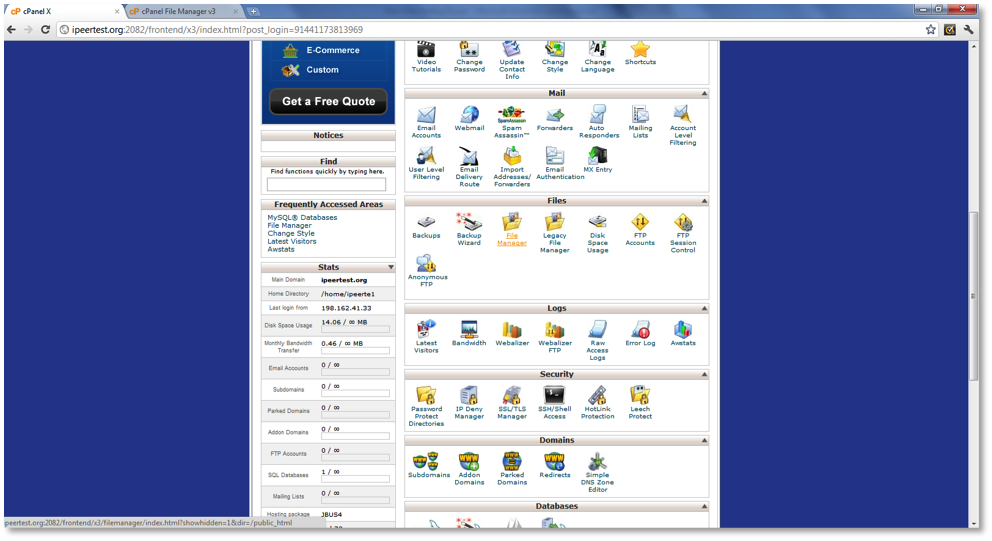
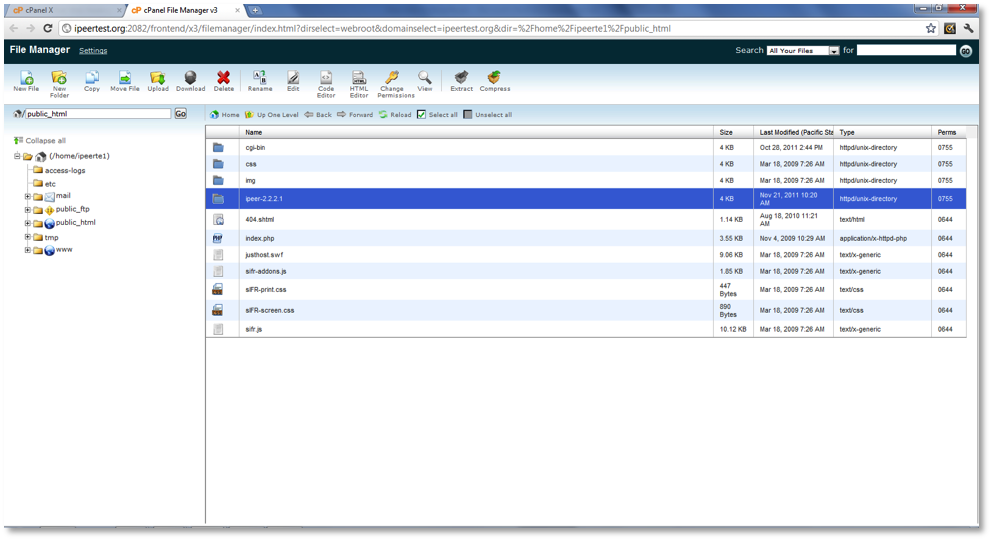
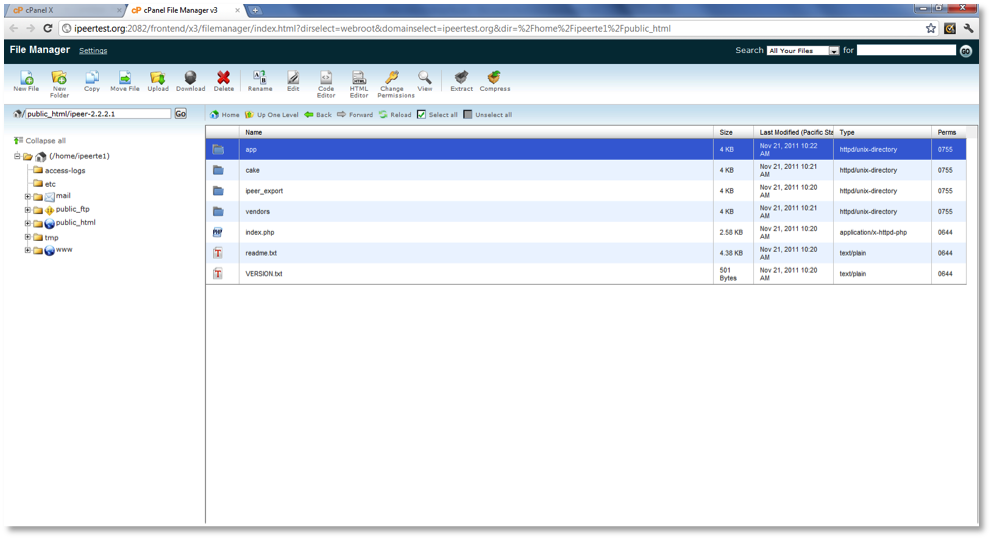
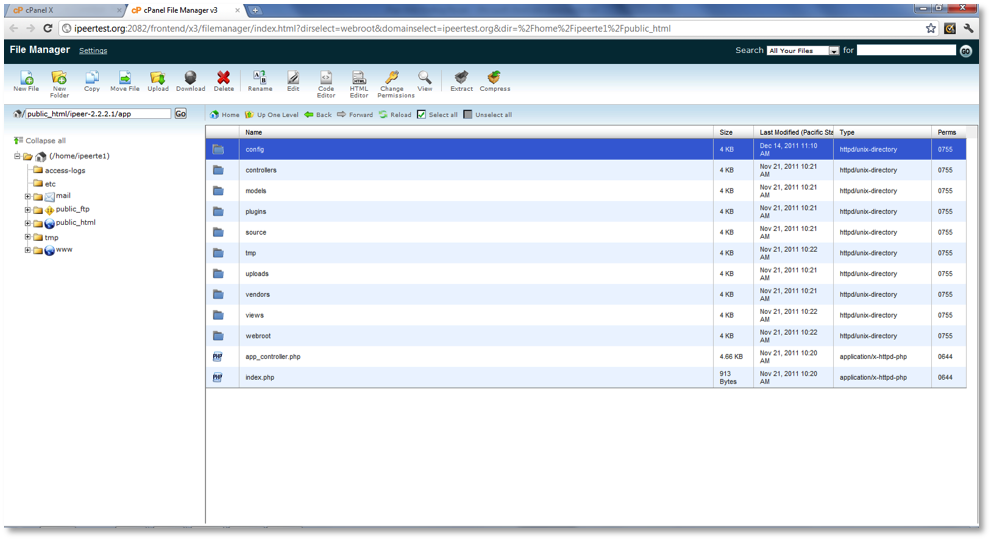
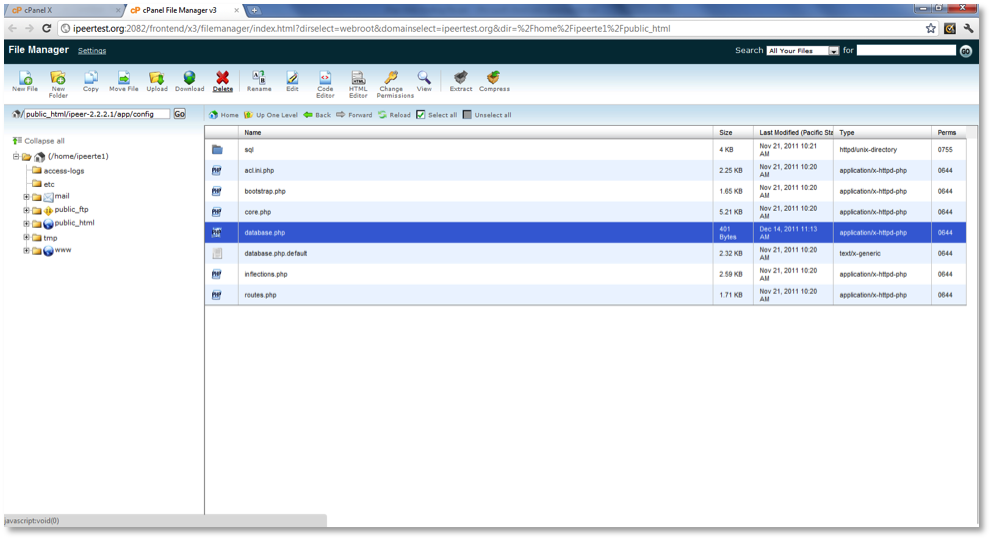
- If you find that you have incorrectly installed an iPeer instance, you need to go to the File Manager, navigate to the app folder, within it you have to navigate to the config folder and find the database.php file and delete it. This is shown in the following screenshots. Once you have deleted this file, then you need to redo the installation from the start of Step 7.
Step 8: Referring to existing iPeer documentation to learn how to use iPeer.
You now need to do the following:
- Visit http://ipeer.ctlt.ubc.ca/wiki/UserDocV3 and start learning how to use iPeer by going over instructions provided.
- You can try out iPeer on a sample server by going to http://ipeerdemo.elearning.ubc.ca/ To login you will need a username and password, which you can find on http://ipeer.ctlt.ubc.ca/wiki/Demo under heading iPeer v3.
- Also, you can go to http://ipeer.ctlt.ubc.ca if you need help with iPeer issues and support can be provided to instructors who sign up on the mailing list.
Attachments (20)
- key_features.png (224.1 KB ) - added by 14 years ago.
- sourceforge.png (228.9 KB ) - added by 14 years ago.
- filezilla.png (291.1 KB ) - added by 14 years ago.
- filezilla1.png (306.1 KB ) - added by 14 years ago.
- filezilla2.png (149.5 KB ) - added by 14 years ago.
- filezilla3.png (231.0 KB ) - added by 14 years ago.
- justhost1.png (233.9 KB ) - added by 14 years ago.
- justhost2.png (173.2 KB ) - added by 14 years ago.
- justhost3.png (117.0 KB ) - added by 14 years ago.
- justhost4.png (156.9 KB ) - added by 14 years ago.
- ipeer6.png (220.1 KB ) - added by 14 years ago.
- ipeer7.png (163.5 KB ) - added by 14 years ago.
- ipeer8.png (144.8 KB ) - added by 14 years ago.
- ipeer9.png (173.2 KB ) - added by 14 years ago.
- ipeer10.png (162.0 KB ) - added by 14 years ago.
- ipeer1.png (134.2 KB ) - added by 13 years ago.
- ipeer2.png (178.5 KB ) - added by 13 years ago.
- ipeer5.png (39.4 KB ) - added by 13 years ago.
- ipeer3.png (54.9 KB ) - added by 13 years ago.
- ipeer4.png (37.8 KB ) - added by 13 years ago.

