
| Version 43 (modified by , 16 years ago) ( diff ) |
|---|
Table of Contents
iPeer User Documentation
(Created August 2010)
iPeer is an application to develop and deliver rubric-based peer evaluations, to review and release student comments, to build progress report forms online, and to analyze evaluation results. It has extensive features including user management system, student feedback control, data import/export, automatic installer, self-evaluation and etc… (from: http://ipeer.apsc.ubc.ca/home/?page=about)
Technical Information
iPeer is a Web Application. This means that it runs on a server, and can be accessed with any web browser.
iPeer is written in a web programming language PHP (http://www.php.net) and uses a framework called CakePHP. (http://www.cakephp.org) to structure its code.
For more technical details, please see trac website at http://burrito.olt.ubc.ca/trac/
Students
The students interface is focused on completing evaluations. After students have been created, and assigned to courses, they can log into the system, and complete evaluation events.
Login for Students
Students can log in via 2 mechanisms:
- via username and password, like every other user on the system.
- via the CWL plug-in (for University of British Columbia (UBC)).
- Note that if this plug-in is enabled, the students cannot login via iPeer's username and password, and must use their CWL login.
iPeer Login for Students
The students login with their username and password.
- Username: enter your student number
- Password: enter the password given to you by your instructor or TA. You can update it later.
Click the login button to complete the login process.
CWL Login for UBC Students
Click on the CWL logo at the login screen, and you will be taken to the UBC CWL login page. Login just like for other UBC pages, and after the logon is complete, you'll be taken iPeer Home.
- Please note that if you use your CWL login, changing your password in iPeer will have no effect on your CWL password.
Updating Email on First Logon
If this your first time logging into iPeer, you may be asked to update your email. Please enter you email to the right Email: label, and click the Save button on the bottom of the screen. The top of your page should now read:
Your Profile Has Been Updated Successfully.
Go to your iPeer Home page.
Click on the orange "Go to your iPeer Hope page" link to finish.
Home Page
When a students logs in, they are presented with the home page. Student's view of iPeer is focused on submitting evaluations assigned by their instructors.
This page contains 2 sections, both listing evaluation events:
Peer Evaluations Due
These are the evaluation that should be completed. For example:
| Event | Course | Due Date | Due In / Late By (red) |
| Evaluation 1 | COMP 101 101 | Sun, Sep 5, 2010 11:55 am | 30 day(s) |
To complete an evaluation, just clink on its title. So, to complete the above event, you would click on "Evaluation 2".
Peer Evaluations Submitted
These evaluations were already completed by you. Example:
| Event | Course | Due Date | Date Submitted |
| Evaluation 1 | home COMP 101 101 | Sun, Sep 5, 2010 11:55 am | Fri, Sep 3, 2010 9:25 am |
If you want to see your answers for this evaluation, click on it's title. A new window or tab will pop up, with the evaluation answers, and results, if these were released.
Filling out Evaluations
There are 4 types of evaluations in iPeer: Simple Evaluations, Rubrics, and Mixed evaluations. After clicking on an evaluation name, the selected evaluation will open:
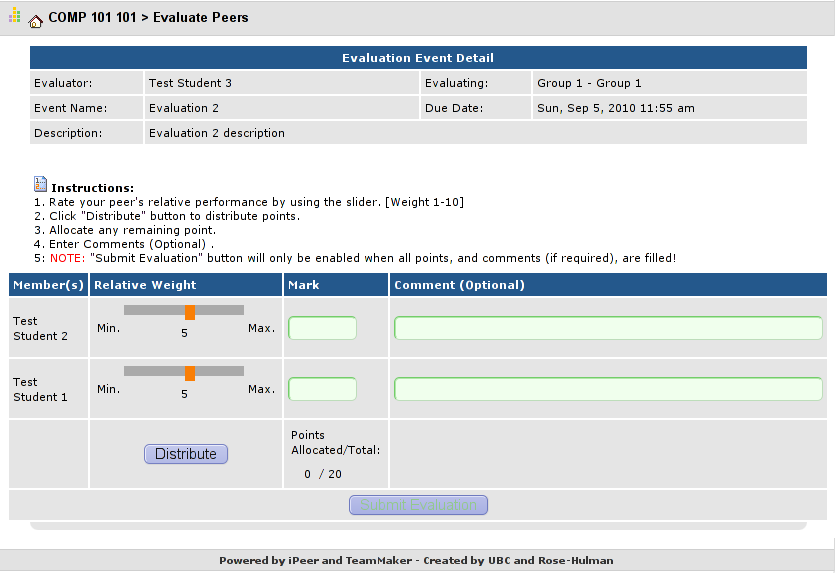
Simple Evaluations
 Simple evaluations are the most basic evaluation types in iPeer. There are a set number of points to distribute among your team members.
The following instructions appear on the evaluation page itself, and this manual will expand on each of the point state:
Simple evaluations are the most basic evaluation types in iPeer. There are a set number of points to distribute among your team members.
The following instructions appear on the evaluation page itself, and this manual will expand on each of the point state:
- Rate your peer's relative performance by using the slider. [Weight 1-10]
- iPeer has an semi-automatic system for distributing points with amongst your team members. Slide each of the orange sliders in to evaluate your team members relative to one another. You are now assigning slider points
- Click "Distribute" button to distribute points.
- iPeer will calculate the percentage of "relative points" you assigned to each of your teammates, and will then calculate how many real points each is given.
- For example, the evaluation has 200 Real Points to distribute amongst your 4 teammates. You assign them "relative score" of 8 for each. You then click distribute. The total number of "relative scores" will be 32. Since you gave each member 8 relative point, their will all get 4/32*100% = 25% of the total read score. When calculating "real score", each member will get 200 Points * 25% = 50 points / member.
- The above situation would repeat itself if you assigned each member a slider score, of 2, or 4, or 6, or anything else. Since the number of "relative points" you gave to each member mains equal, they will all be equal relative to one another. It is only the relative score for each member that counts, and will determine the real points at the end.
- If the above info is confusing, then simply forget about the sliders and Distribute button! Instead, enter the number of points you would like to give to each teammate manually, fill out the comments, and submit your evaluation. Remember, make sure that the points add up to the total number of points to distribute. This is explained in point 3. bellow.
- Allocate any remaining points.
- This step usually occurs in cases where the "Distribute" button could not allocate all the points exactly according to your relative scores.
- For example, if you relative-scored all your three teammates equally, and the number of total points is 100, the real points cannot be equally divided! Each member would get 33 points, and 33+33+33 = 99, with one real point left to distribute. To distribute this point, you would give one of your team members a score of 34 manually. That way, the total real score would be 34 + 33 + 33 = 100, and all points would be distributed.
- If "Distribute" button succeeded in giving everyone an fair score, or if you distributed all the points yourself, this step is obviously unnecessary!
- Enter Comments
- You may always enter a comment. Some instructors will require you to enter comments, and others will not. Whatever the case might be, please remember that explaining the reasons for your evaluation of your team-mates is always a good idea!
- NOTE: "Submit Evaluation" button will only be enabled when all points, and comments (if required), are filled!
- Before you submit:
- Look over your scores on more time.
- Check that you entered all the comments that you like, or are required to.
- If the Submit button is grayed out, you are missing something. Check the comments and total number of real points once again.
- Before you submit:
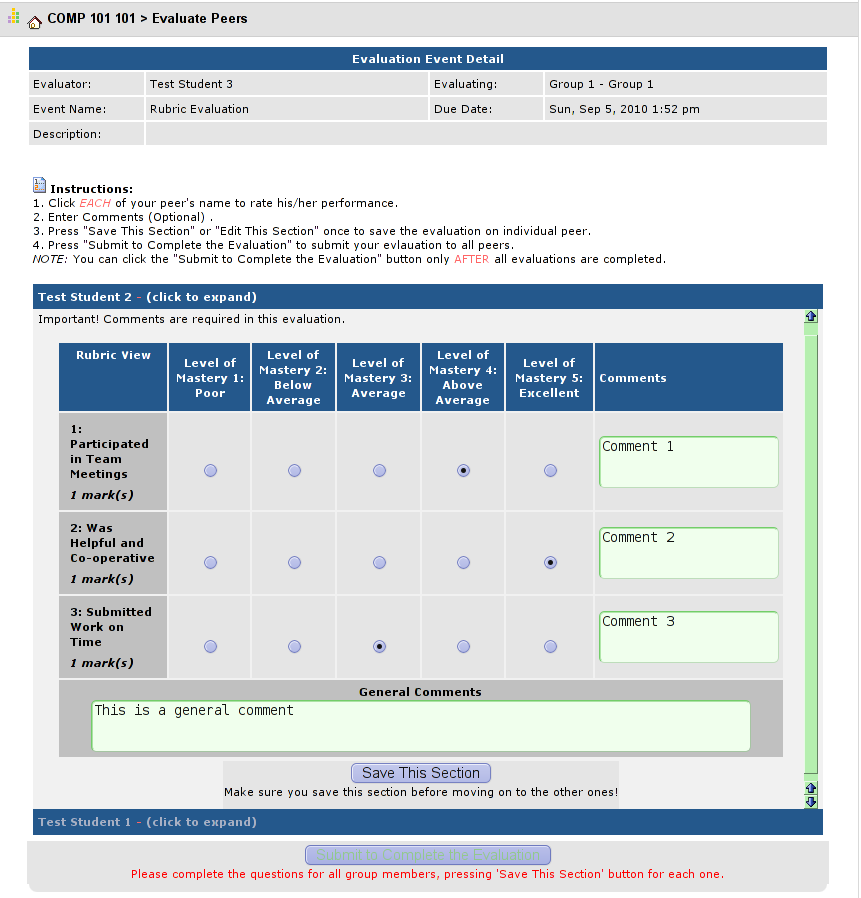
Rubric Evaluations
 In Rubric Evaluations, you will rate your team members on different aspects of their performance.
- For example, if one of your teammates participates very well in meetings, but is late turning in assignments, you could rate them separately on these categories.
Each category has a score, and comment.
- Filling out the score is required. There are usually 5 available scores. Make sure to set a score for each category. The lowest score is selected by default.
- Comments may or may not be required, depending on your instructor's wishes. When writing comments, please be thorough, respectful and descriptive.
All you teammate's forms will be arranged in a "accordion"-type interface. This means that each member's evaluation is folded-up. Here's an example with 4 teammates:
| Group Member Wilma | - | (click To expand) |
| Group Member Fred | - | (click To expand) |
| Group Member Betty | - | (click To expand) |
| Group Member Barny | - | (click To expand) |
- The first your first teammate's evaluation will be shown already.
- Please fill out that first team mate's evaluation, and save it!
- If you don't save each part as you fill it out, the information could be lost when you move on to the next teammate.
- When you click another teammate's name, their evaluation forms will unfold. You can now complete the evaluation and Save it. Please complete each teammate's evaluation in this way.
- You may freely go back and forth between your teammates, but if you modify anything for a teammate, please save the section.
- When you save a section, the interface will show your first teammate again. This is a known iPeer issue - please select your next teammate manually.
- When you are dome, submit the evaluation.
- If the Submit button is disabled, some of the evaluations have not been complete. You should:
- Check that you have completed the evaluations for all students.
- If your instructor requires comments, check all the input fields (blank-white areas) for your teammates are filled. There's a comment for each teammate's category, and a general comment about each teammate.
- If the Submit button is disabled, some of the evaluations have not been complete. You should:
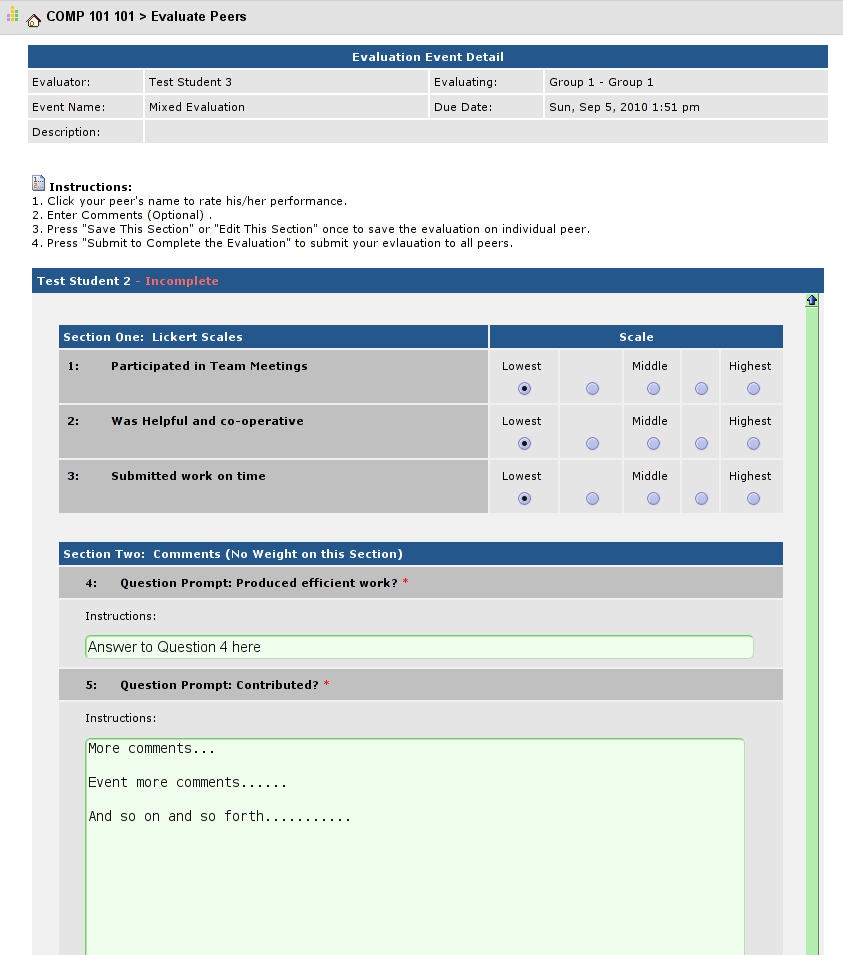
Mixed Evaluations

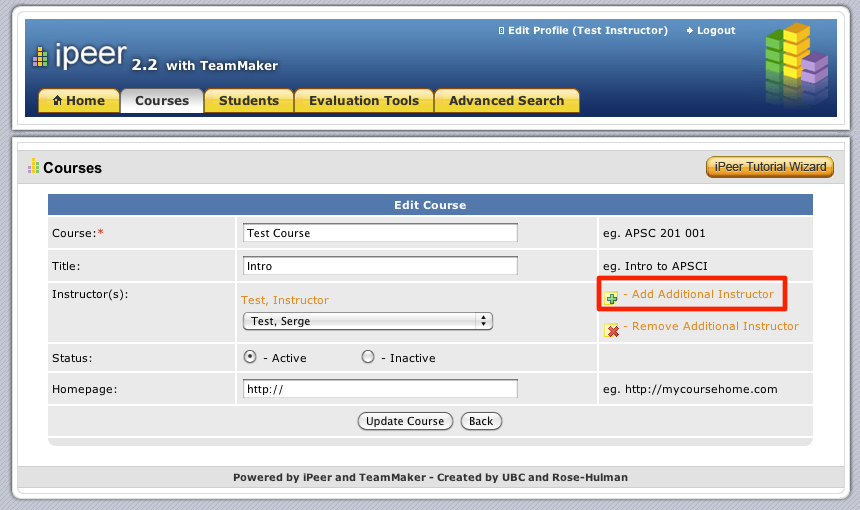
Instructors
Instructors form the second largest user group. Instructors have the added ability to:
- edit courses
- add/edit/copy students
- add/edit/copy groups
- create/edit/copy evaluation formats
- add/edit/copy evaluation events
- email groups
Note: Instructors are only allowed to modify information related to their courses.
Administrators
Administrators form the smallest user group. An administrator has instructor capabilities (see above) for all courses and users. The administrator also has the privilege to delete information, which can cause data inconsistency. There is also a super admin account that is used for administration of all users including administrators. Administrators should be extremely cautious when removing data as it is very easy to cause database inconsistencies. * For example, a to removing a student that has been enrolled in a course, and has taken evaluations will likely cause errors when those evaluations are viewed. It is best to leave old users in the database.
Icons
Below is a description of the icons that are used in the iPeer web application.
![]()
Glossary
Evaluation Event: An evaluation task which is assigned to specific groups of students. An evaluation event must also has an evaluation format, release time (starting and end), and due date.
Evaluation format: Methods for members of a group to evaluate other members (and possibly themselves).
Rubric evaluation: An evaluation format where a matrix is used to rate students according to different levels of mastery (e.g. poor, satisfactory, excellent). Students assess their team members' contributions through answering multiple choice type questions and providing written comments if desired.
Simple Evaluation: An evaluation format where members rate other members (possibly themselves) by allocating to each member a portion of a possible mark total (conceptually dividing up money among group members).
Attachments (14)
-
documentation-simpleEvalExample1.png
(58.1 KB
) - added by 16 years ago.
Example of a Student View of a Simple Rubric for the User Documentation
-
documentation-rubricEvalExample1.png
(108.0 KB
) - added by 16 years ago.
Example of a Student View of a Rubric Evaluation for the User Documentation
-
documentation-mixedEvalExample1.png
(77.5 KB
) - added by 16 years ago.
Example of a Student View of a Mixed Evaluation for the User Documentation
- icon-guide.jpg (83.1 KB ) - added by 16 years ago.
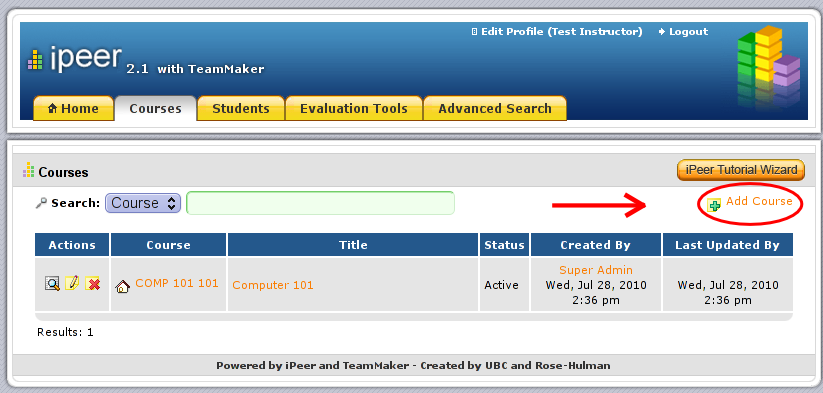
- documentation-addACourse.png (55.1 KB ) - added by 16 years ago.
-
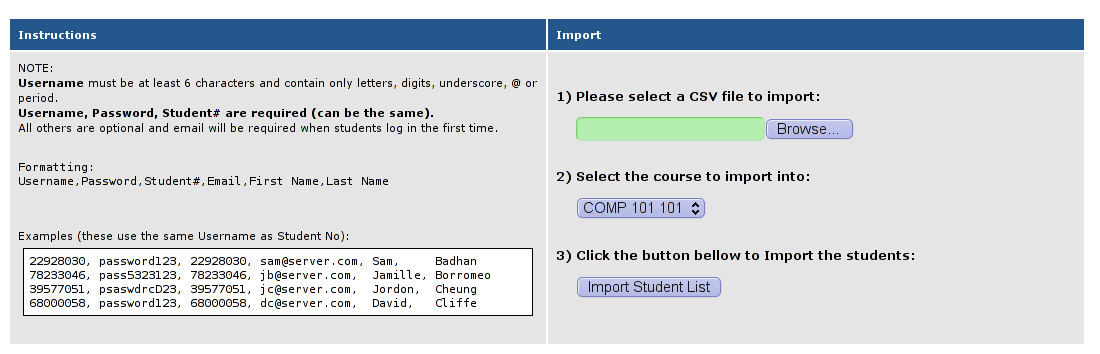
documentation-studentImportForm.png
(63.5 KB
) - added by 16 years ago.
The Student Import form in iPeer
- documentation-importedStudents.png (102.3 KB ) - added by 16 years ago.
-
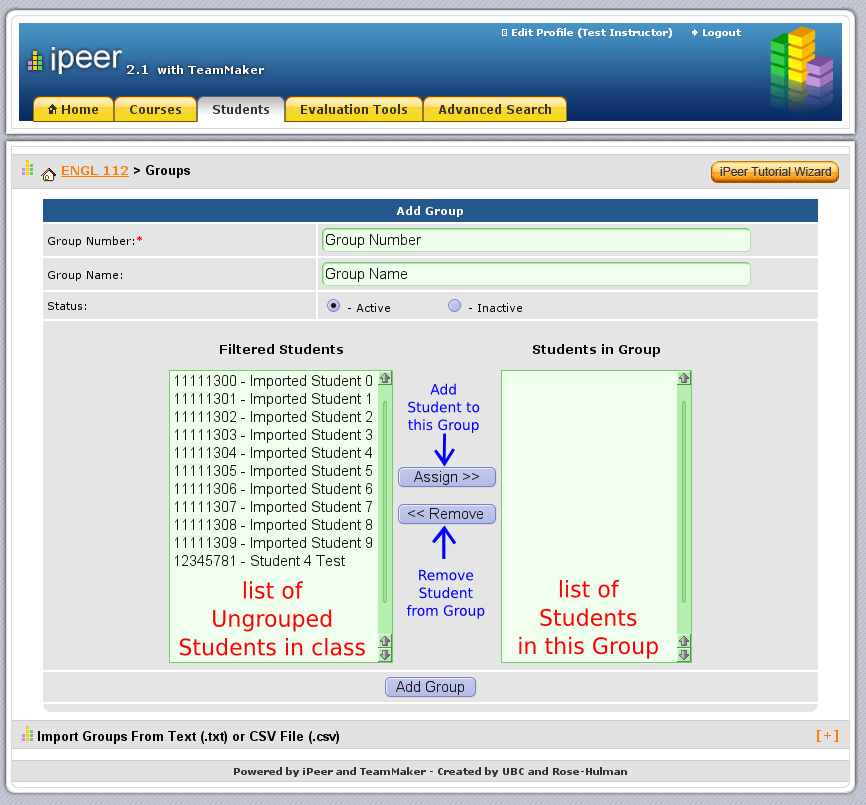
documentation-groupCreationManual.png
(112.6 KB
) - added by 16 years ago.
ScreenShot of manual Group creation
-
Simple.swf
(309.2 KB
) - added by 16 years ago.
Falsh video explaining creation of Simple Evaluations and Adding the evaluation event for these.
-
Rubric.swf
(485.6 KB
) - added by 16 years ago.
Falsh video explaining creation of Rubric Evaluations and adding the evaluation event for these.
-
Mixed.swf
(435.9 KB
) - added by 16 years ago.
Falsh video explaining creation of Mixed Evaluations and Adding the evaluation event for these.
-
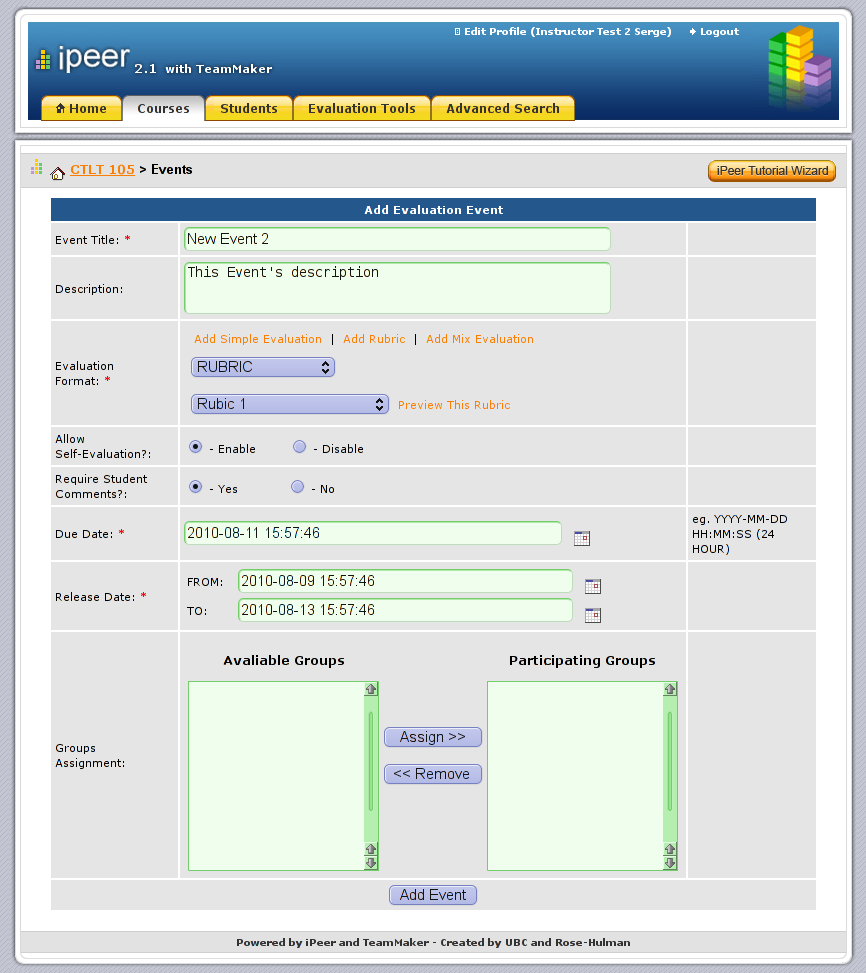
documentation-AddEvent.png
(129.1 KB
) - added by 16 years ago.
Add Evaluation Event Screen Shot
-
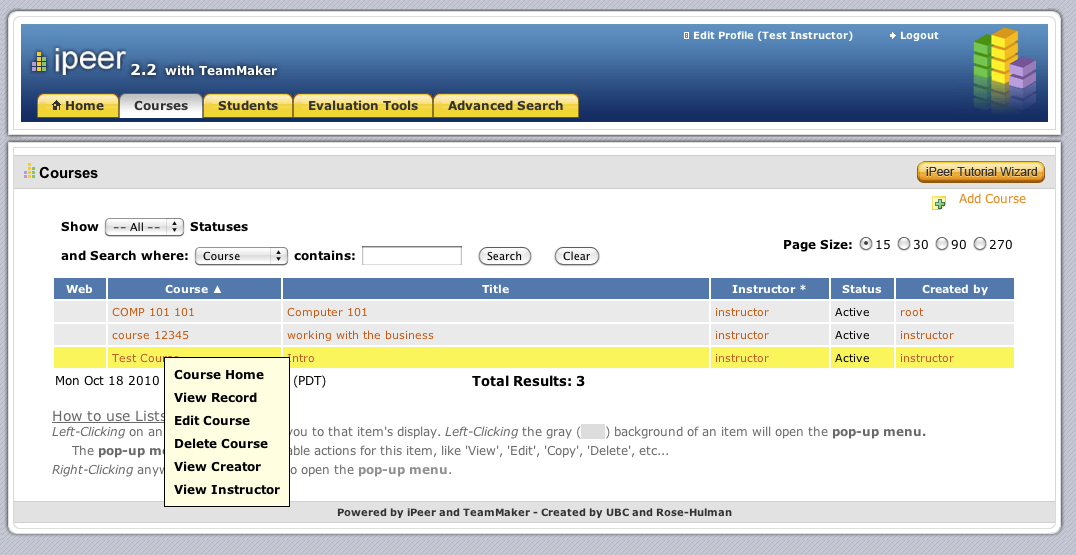
documentation-editACourse.png
(122.8 KB
) - added by 16 years ago.
Icons for Editing and Deleting Courses
-
adding_instructor.png
(85.2 KB
) - added by 16 years ago.
add instructor screenshot