
| Version 19 (modified by , 12 years ago) ( diff ) |
|---|
Table of Contents
iPeer User Documentation
iPeer is an application to develop and deliver rubric-like peer evaluations, to review and release student comments, to build progress report forms on-line, and to analyze evaluation results. It has extensive features including a user management system, student feedback control, data import/export, automatic installer, self-evaluation and etc…
Technical Information
iPeer is a Web Application. This means that it runs on a server, and can be accessed with any web browser.
iPeer is written in a web programming language called PHP (http://www.php.net) and uses an application framework called CakePHP. (http://www.cakephp.org) to structure its code.
For more technical details, please see iPeer's Trac website at http://ipeer.ctlt.ubc.ca/
There are 5 types of users in iPeer: students, tutors, instructors, faculty administrators, and administrators.
Students
The students interface is focused on completing evaluations. After students have been created they can log into the system, and after they have been assigned to courses they can complete evaluation events and surveys.
Login for Students
Students can log in via 2 mechanisms:
- via username and password, like every other type of iPeer user.
- via the CWL plug-in (for University of British Columbia (UBC)).
- Note that if CWL plug-in is enabled, the students cannot login via iPeer's username and password, and must always use their CWL login.
iPeer Login for Students
The students login with their username and password.
- Username: enter your student number.
- Password: enter the password given to you by your instructor or TA. You can update your password later.
Click the login button to complete the login process.
CWL Login for UBC Students
Click on the CWL logo at the login screen, and you will be taken to the UBC CWL login page. Login like you do for other UBC pages, and after the login is complete, you'll be taken iPeer Home.
- Please note that if you use your CWL login, changing your password in iPeer will have no effect on your CWL password.
Home Page
When a students logs in, they are presented with the home page. Student's view of iPeer is focused on submitting evaluations assigned by their instructors.
This page contains 5 sections, listing evaluation events:
Peer Evaluations Due
These are the evaluations that should be completed. Example:
| Event | Group | Course | Due Date | Due In / Late By |
| Evaluation 2 | Unnamed | COMP 101 101 | Sun, Sep 5, 2010 11:55 am | 30.2 days |
To complete an evaluation, just click on its title. So, to complete the above event, you would click on "Evaluation 2".
Peer Evaluations Submitted
These evaluations were already completed. Example:
| Event | Result Available / End | Group | Course | Due Date | Date Submitted |
| Evaluation 1 | 2013-01-01 00:00:00 | Unnamed | COMP 101 101 | Tues, Jan 1,2012 12:00 am | 2012-11-23 12:24:51 |
If the "Viewable Start / End" date is coloured
- red, the name of the event is a link to the previously submitted evaluation, allowing students to change their submission.
- black, the name of the event is a link to the evaluation answers and results (if they were released by the instructor).
If the name of the event is not a link, the event has ended (no more submissions can be made) and the results are not viewable yet.
Peer Evaluations Expired With No Submission
These evaluations have expired and have not been completed. Example:
| Event | Result Available / End | Group | Course | Due Date |
| Evaluation 3 | 2013-01-01 00:00:00 | Unnamed | COMP 101 101 | Tues, Dec 25,2012 12:00 am |
If the name of the event is a link, results are viewable
Surveys Due
These are the surveys that should be completed. Example:
| Event | Course | Due Date | Due In / Late By |
| Survey 1 | COMP 101 101 | Tues, Jan 8,2013 12:00 pm | 6 days |
To complete a survey, just click on its title. So, to complete the above survey, you would click on "Survey 1".
Surveys Submitted
These surveys were already completed. Example:
| Event | Course | Due Date | Date Submitted |
| Survey 2 | COMP 101 101 | Tues, Jan 1, 2013 12:00 pm | 2012-12-25 11:37:17 |
The name of the event is a link to the answers submitted.
Filling out Evaluations
There are 3 types of evaluations in iPeer: Simple Evaluations, Rubrics, and Mixed Evaluations. After clicking on an evaluation name, the selected evaluation will open.
Simple Evaluations
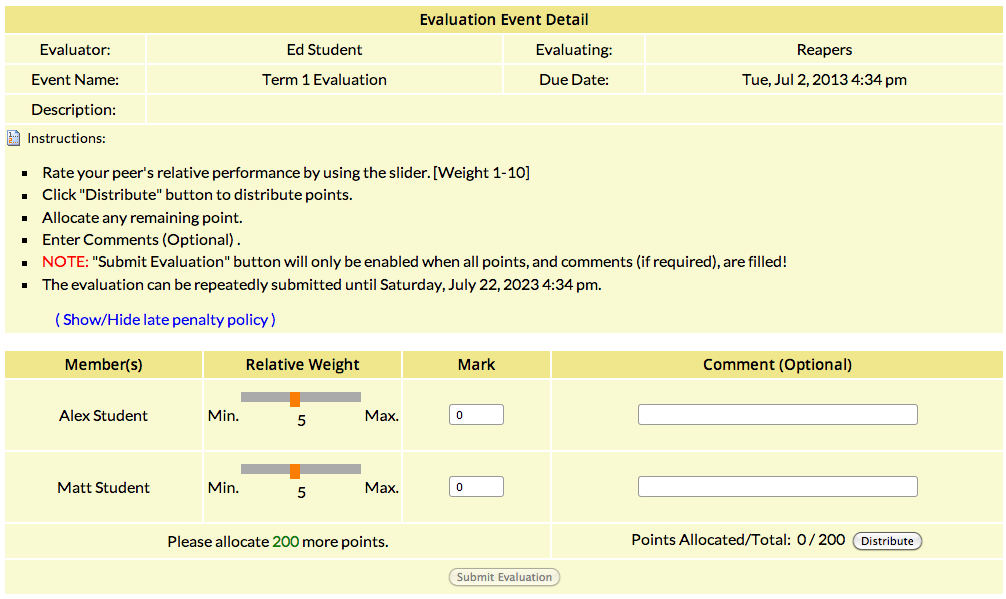
 Simple evaluations are the most basic evaluation types in iPeer. They consist of a set number of points to distribute among your team members.
The following instructions appear on the evaluation page itself:
Simple evaluations are the most basic evaluation types in iPeer. They consist of a set number of points to distribute among your team members.
The following instructions appear on the evaluation page itself:
- Rate your peer's relative performance by using the slider. [Weight 1-10]
- iPeer has a semi-automatic system for distributing points with amongst your team members. Slide each of the orange sliders to evaluate your team members relative to one-another. This will assign them "slider-points".
- Click "Distribute" button to distribute points.
- iPeer will calculate the percentage of "slider-points" you assigned to each of your teammates, and will then calculate how many real points each is given. For example, the evaluation has 200 Real Points to distribute amongst your 4 teammates. You assign them "relative score" of 8 for each. You then click distribute. The total number of "relative scores" will be 32. Each member has 8 relative points, their will all get 8/32*100% = 25% of the total real score. In real score, each member will get 200 Points * 25% = 50 points / member.
- The above situation would repeat itself if you assigned each member a slider score, of 2, or 4, or 6, or anything else. Since the number of "relative points" you gave to each member mains equal, they will all be equal relative to one another. It is only the real score for each member that counts.
- Quick note: If the above info is confusing, then simply forget about the sliders and Distribute button! Instead, enter the number of points you would like to give to each teammate manually, fill out the comments, and submit your evaluation. Make sure that the points add up to the total number of points to distribute. This is explained in point 3, below.
- Allocate any remaining points.
- This step usually occurs in cases where the "Distribute" button could not allocate all the points exactly according to your relative scores.
- For example, if you relative-scored all your three teammates equally, and the number of total points is 100, the real points cannot be equally divided! Each member would get 33 points, and 33+33+33 = 99, with one real point left to distribute. To distribute this point, you would give one of your team members a score of 34 manually. That way, the total real score would be 34 + 33 + 33 = 100, and all points would be distributed.
- If "Distribute" button succeeded in giving everyone a fair score, or if you distributed all the points yourself, this step is unnecessary.
- Enter Comments
- You may always enter a comment. Some instructors will require you to enter comments, and others will not. Whatever the case might be, please remember that explaining the reasons behind your evaluation of your team-mates is always a good idea!
- NOTE: "Submit Evaluation" button will only be enabled when all points are distributed, and comments (if required) are filled!
- Before you submit:
- Look over your scores one more time.
- Check that you entered all the comments that you like, or are required to.
- If the Submit button is grayed out, something is likely missing. Check the comments and total number of real points once again.
- Before you submit:
- The evaluation can be repeatedly submitted until date.
- Resubmissions are allowed until the date and time specified.
- (Show / Hide late penalty policy)
- If the evaluation has a late penalty, details can be found here.
- If there are no late penalty, "No penalty is specified for this evaluation" will appear.
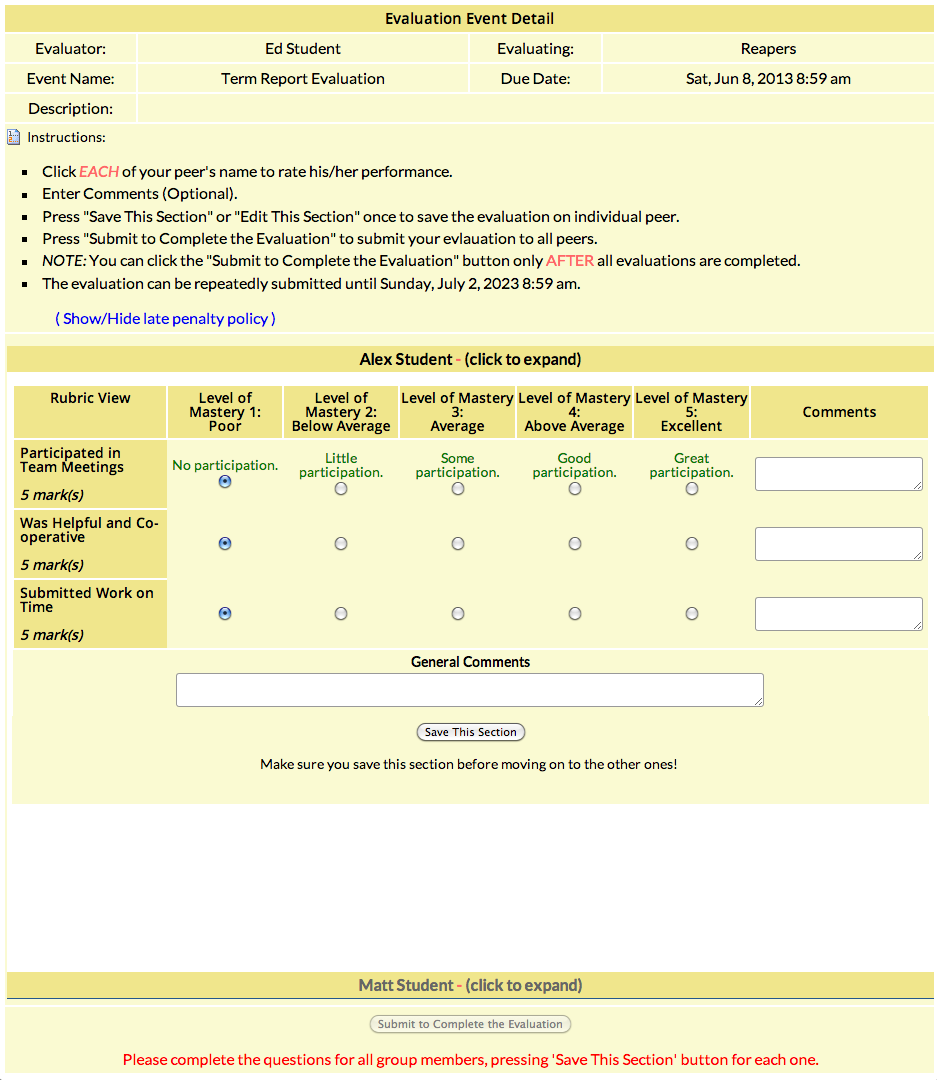
Rubric Evaluations
 In Rubric Evaluations, you will rate your team members on different aspects of their performance.
- For example, if one of your teammates participates very well in meetings, but is late turning-in assignments, you could rate them separately on these categories.
Each category has a score, and comment.
- Filling out the score is required. Make sure to set a score for each category.
- A score has to be set for each category before the evaluation can be saved. The unanswered categories will be marked in red.
- Comments may or may not be required, depending on your instructor's wishes. When writing comments, please be thorough, respectful and descriptive.
All you teammate's forms will be arranged in a "accordion"-type interface. This means that each member's evaluation is folded-up. Here's an example with 4 teammates:
| Group Member Wilma | - | (click to expand) |
| Group Member Fred | - | (click to expand) |
| Group Member Betty | - | (click to expand) |
| Group Member Barny | - | (click to expand) |
- Your first teammate's evaluation will be shown already.
- Please fill out that first team mate's evaluation, and save it!
- If you don't save each part as you fill it out, the information could be lost when you move on to the next teammate. Always be sure you saved.
- When you click another teammate's name, their evaluation forms will unfold. You can now complete the evaluation and Save it. Please complete each teammate's evaluation in this way.
- You may freely go back and forth between your teammates, but if you modify anything for a teammate, please save their section before moving on.
- When you save a section, the accordion interface will show your first teammate's evaluation form again. This is a known iPeer issue - please select your next teammate manually for now.
- When you have finished rating and commenting on all your teammates, submit the evaluation!
- If the Submit button is disabled, some of the evaluations have not been complete. You should:
- Check that you have completed the evaluations for everyone.
- If your instructor requires comments, check all the input fields (blank-white areas) for your teammates are filled. There's a comment for each teammate's category, and a general comment about each teammate.
- If the Submit button is disabled, some of the evaluations have not been complete. You should:
- Late Penalty
- To check whether it is implemented for the evaluation, click on "(Show / Hide late penalty policy)".
- The evaluation can be repeatedly submitted until the date and time specified in the instruction.
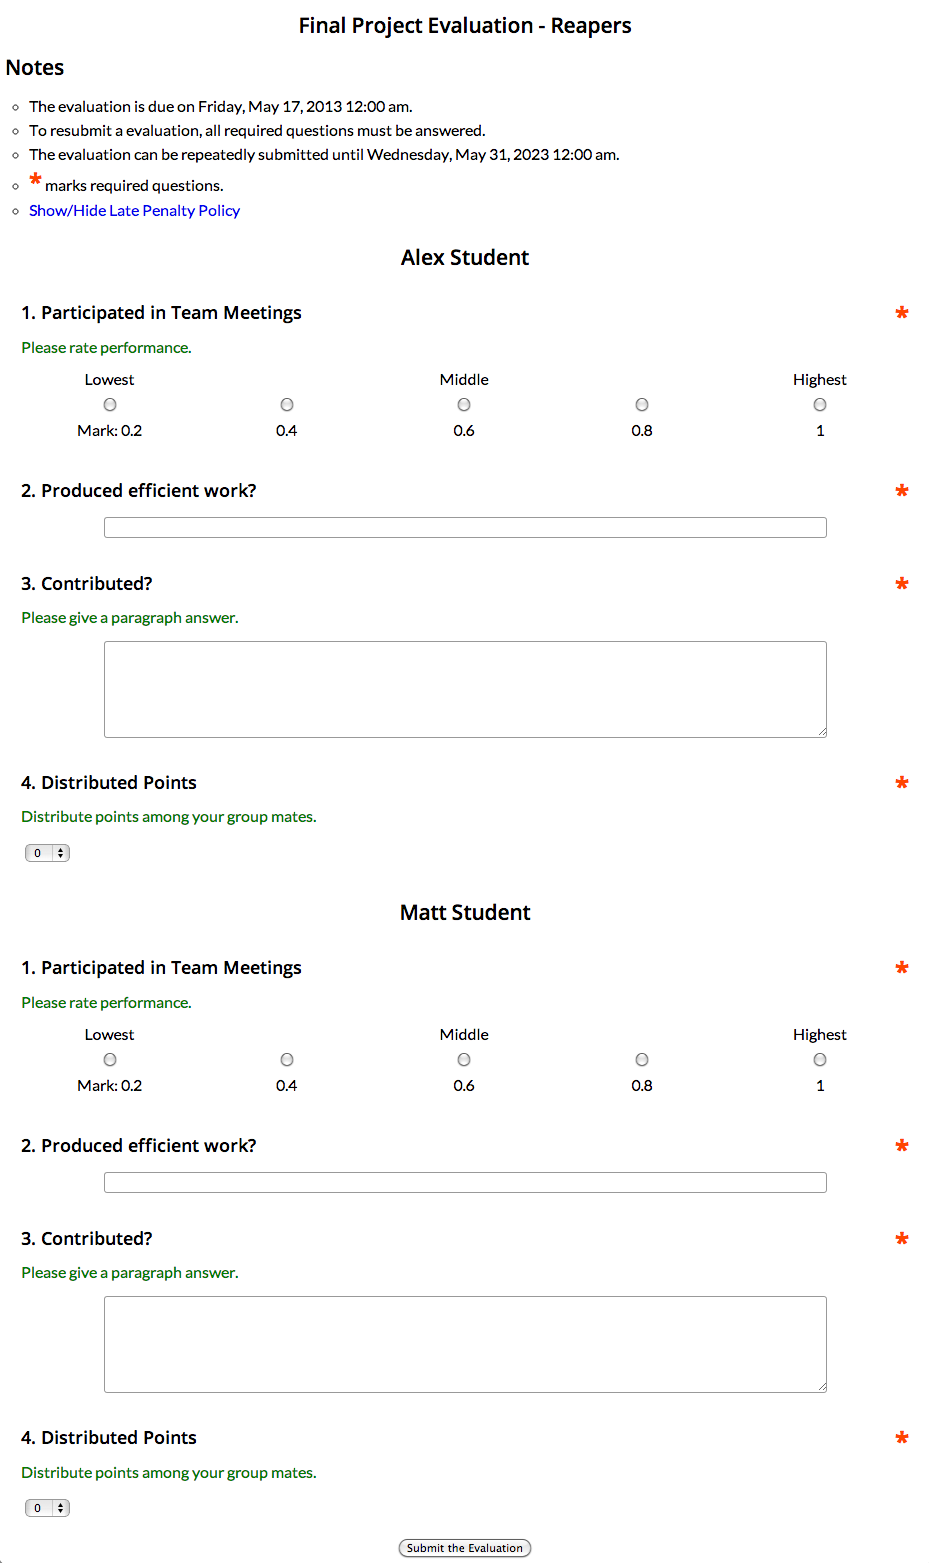
Mixed Evaluations
 Mixed evaluations may have different question types that include Likert questions (rubric-like),
short answers, long answers, and Score Dropdown (simple evaluation like).
Mixed evaluations may have different question types that include Likert questions (rubric-like),
short answers, long answers, and Score Dropdown (simple evaluation like).
- Evaluate your team mates by answering the questions below their name.
- All required questions are marked with a red *.
- You can save your evaluation by clicking on the Submit button at the bottom of the page. Your answers would be saved; however the evaluation would not be submitted until all the required questions are answered.
- Note: If the evaluation has a Score Dropdown question, the evaluation cannot be saved or submitted before all the points are distributed among the members
- After you have filled out all the required questions, you can submit the evaluation by clicking on the Submit button.
- The evaluation can be repeatedly submitted until the date and time specified in the instruction.
- Note: Resubmissions can only be made if all required questions are answered.
- Late Penalty
- To check whether it is implemented for the evaluation, click on "(Show / Hide late penalty policy)".
Instructors
Instructors are responsible for importing student into iPeer, and creating and scheduling evaluations. There are many options and tools; these will be covered in the next sections.
New to iPeer?
If you're an instructor that just started to use iPeer, this is how you can get started. After your account has been created by an administrator, you are ready to login and use iPeer.
- You should login with the username and password provided by your admin.
- If you are at UBC, please note that CWL login does not work for instructor accounts. In iPeer, CWL is meant for students only.
Next is a list of steps for new Instructors. To get your courses up and running, you should:
- First, create a course!
- Then, add students to your course, either one-by-one, or all at once using a CSV file.
- Assign your students into groups.
You would then be ready to create evaluations for your students to complete, which is done like this:
- Create an Evaluation. There are 3 types available, and each evaluation can be re-used many times.
- Create an Evaluation Event. This will give the evaluation to the students to complete, once.
- After the due date, look at the Evaluation Event results, or export them into a CSV or PDF file.
All of these steps are described in details in the sections below.
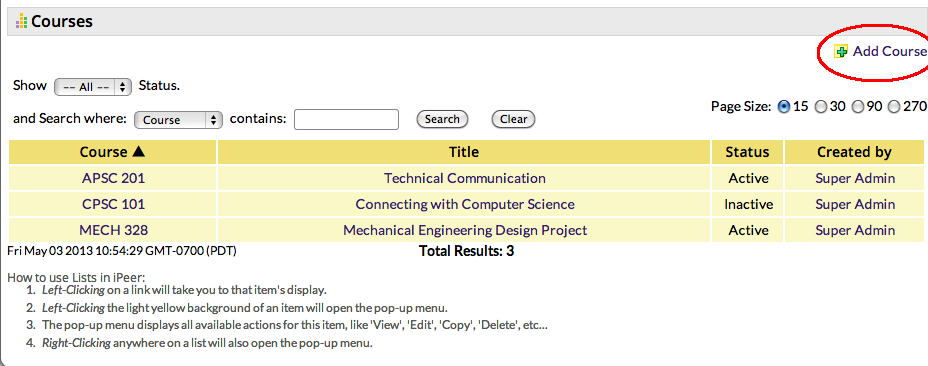
Courses
All objects in iPeer have some connection with courses. Courses contain student lists, group lists, and evaluation events.
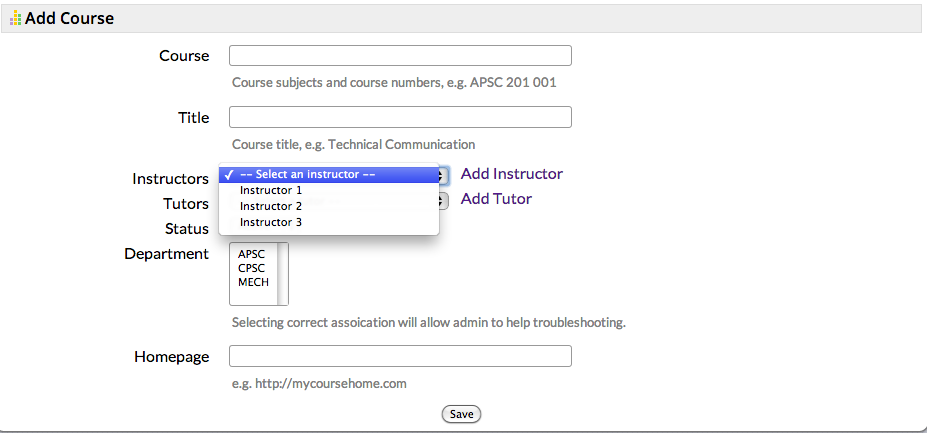
Creating a Course

 To create a course:
- Click on the courses tab.
- Click "Add Course", just like in the image on the right
- Enter a course name. This is best done as [Department] [Course#] [Section#], so for example:
- ENGL 112 102, meaning this is English course number 112, section 102.
- Enter a course Title, like:
- Academic Writing
- Select the instructor(s) of the course. Click "Add Instructor".
- Select the tutor(s) of the course. Click "Add Tutor".
- Select the department(s) the course belongs to. This will allow admins to help troubleshoot. To select multiple departments hold "ctrl" or "command" key.
- Enter a homepage for the course, with a URL starting with http:// or https://
- Click Save. A course list will show up, and you can select your new course to start adding students. To do this, click on the course's name or title.
Course Maintenance
If you ever wish to edit the information you entered when creating your course, you can do this from the courses tab:
- Click on the courses tab.
- Right click on the course and select "Edit Course" on the menu.
- Edit any information you choose, and save it by clicking the "Save" Button.
You may also delete your own courses. Please be warned: deleting a course also removes all students from that course, their responses to evaluations for that course, and any evaluation events. If you are absolutely, positively sure that you want to delete a course, this is done by:
- Clicking on the courses tab.
- Right click on the course and select "Delete Course" on the menu.
- Confirm that you intend to delete the course by clicking on the OK button.
- The course is now deleted.
Course Home Screen
Most functionality is accessed from a course's home screen. You can manage students, groups, and evaluation events from the home screen. To activate it:
- Click on the courses tab.
- Click on your course's name or title links.
Details of what is done at the home screen are found in the next few sections.
Students
Adding students to your courses can be done in 2 ways, and these are explained below:
Adding Students one by one
This method is best for classes with few (10-20) students. Each student is entered manually via iPeer form. For larger classes, it may be better to assemble a CSV form, as described in the next section
- Go to a course's home page.
- Click on "Add Student"
- Enter the student's username. If
- a duplicate username error appears, click on "here" to enrol the student.
- no duplicate username error appears, enter the student's data.
- Note: Username, First Name, Last Name are all required. Email is not required.
- Click Save to add the student, the student password will now be randomly generated and printed near the top of the interface. Please record this password, and give it to this student so that they can login.
- Note, that recording a password is not necessary if you are at UBC, since the students can use CWL to login to iPeer.
- Click on Save & Add Another to add more students. Then, repeat step 3. for all the students in the class.
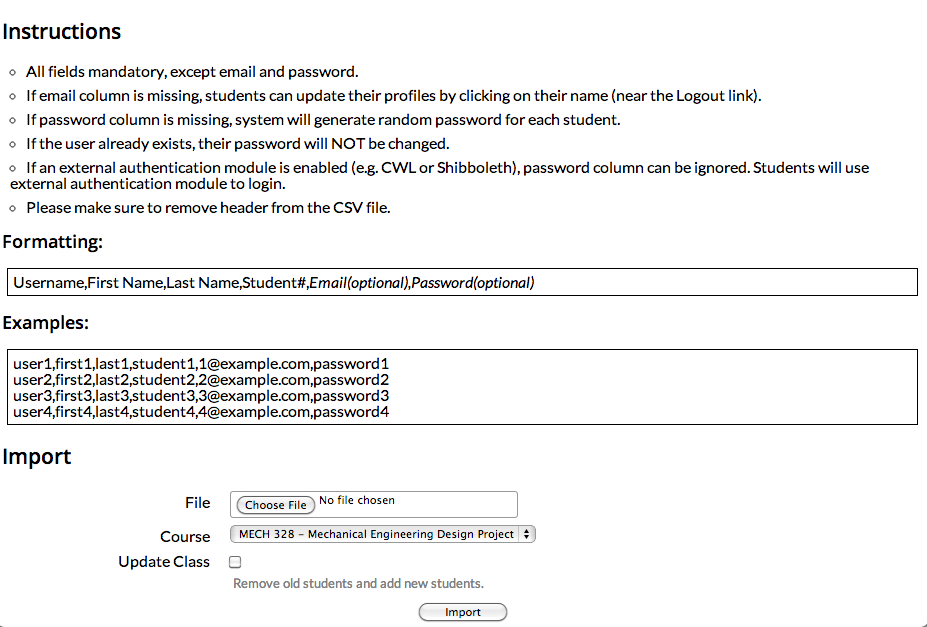
Adding Students via CSV file
To add many students, you can create a CSV file in the following format:
Each line represents a new student, and the column order is the following:
Username, First Name,Last Name, Student#, Email (optional), Password (optional)
22928030, Sam, Badhan, 22928030, sam@server.com, password123
78233046, Jamille, Borromeo, 78233046, jb@server.com, pass5323123
39577051, Jordon, Cheung, 39577051, jc@server.com, psaswdrcD23
68000058, David, Cliff,  68000058,  dc@server.com, password123
If you wish to leave the Email Column out, just empty that column out, leaving the comma, for example:
22928030, Sam, Badhan, 22928030,, password123
78233046, Jamille, Borromeo, 78233046,, pass5323123
39577051, Jordon, Cheung, 39577051,, psaswdrcD23
68000058, David, Cliff,  68000058,, password123
Note the double-comma between the student number, and the password. This type of file should be created in a text editor, like Notepad. You could also create this file with a spreadsheet editor like OpenOffice Calc, or Microsoft Excel, but make sure you set the CSV export settings correctly when saving the file:
- Comma character as the separator.
- No quotes in rows or columns.
When the CSV file is ready, do the following to access the student import form.
- Go to a course's home page.
- Click on "Import Students"

 Follow the steps below to upload your CSV to iPeer.
1) Click on the Browse... or "Choose File" button and select the file from your computer. 2) Select the course to import into:
- Make sure to choose the right course to import the students into. This will not always be set to your current course, so please check this field before importing.
3) If you would like to update your current class list in iPeer (eg. remove students not in your new list and enrol new students in your list), check off "Update Class".
- If you prefer to only add the new students from your new list and not remove students that are not in your new list, don't check off "Update Class".
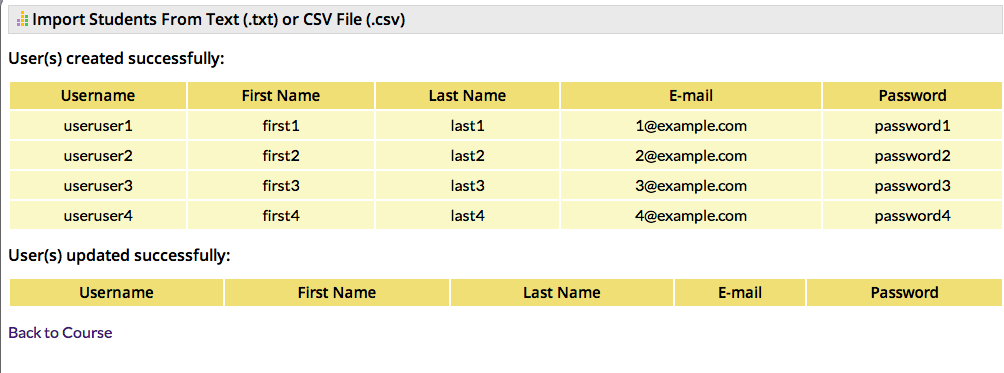
4) Once ready, press Import button to import the students. The next screen will display a summary of the students that were imported. Look over the data to check that the import process completed successfully.
Groups
 After students are imported, groups should be created.
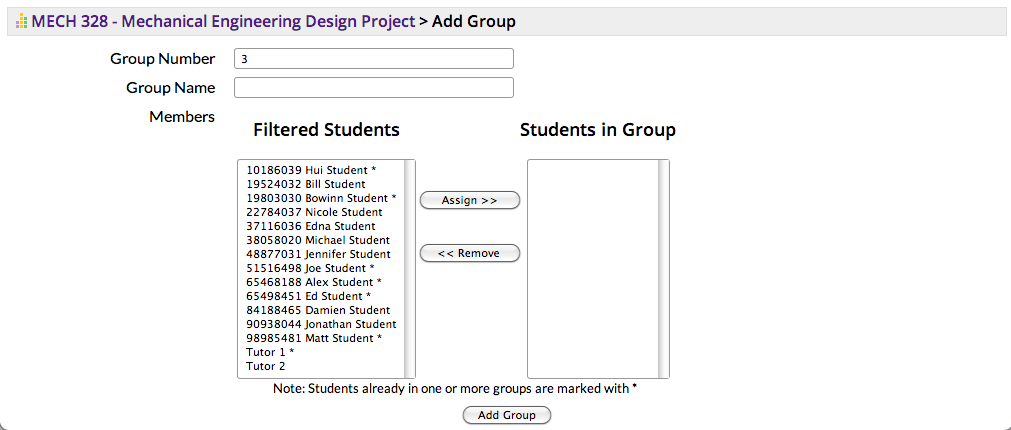
Manual Group Creation
This can be done manually (quick and simple for small to medium sized classes, maybe up to 50 students).
- Go to a course's home page.
- Click on "Create Groups (Manual)".
- There are 2 list of students, one filled with your students on the left, and one empty on the right.
- The students on the left are your students and tutors
- Note: the students who are in one or more groups are marked with *.
- The students on the right are already in the group you are creating.
- Add students to the group. You could do this using one of the following ways below.
- Select one student at a time from the left list, and click the "Assign >>" button. This will add the student to the group.
- Select more than one student by holding the Control, Command, or Shift key while clicking on the students, then clicking the "Assign >>" button. This would transfer all the selected students to the group
- A combination of the above methods. Ex: Select and Add 2 students at a time, then repeat 3 times to make a group of 6.
- If you added a student by mistake, you could remove them from the group by selecting the student from the right list, and clicking on "Remove".
- When you are done adding students to the group, please enter a group name for these students. The group number is autogenerated.
- Click "Add Group" on the bottom of the page
- Repeat this process for all the groups in you class.
Importing group list from CSV file
This method is suited to grouping students in very large classes. It involves a similar process to importing students from a CSV file above.
You should first prepare a CSV file in the following format: The column order is
Student Identifier, Group Name
And the file contents is like:
29978037, Team A
29978063, Team A
29978043, Team B
29978051, Team B
Please ensure that all the students listed have already been created in iPeer, and added to the class. The student identifier you can use are usernames or student numbers but not both.
Similar to the student import procedure, this type of file should be created in a text editor, like Notepad. You could also create this file with a spreadsheet editor like OpenOffice Calc, or Microsoft Excel, but make sure you set the CSV export settings correctly when saving the file:
- Comma character as the separator.
- No quotes in rows or columns.
Once this file is prepared, you are ready to import it into iPeer.
- Go to a course's home page.
- Click on "Create Groups (Import)". This will open the group creation window.
All you need to do now is just follow the instruction for importing the file:
1) Please select a CSV file to import:
- Click "Browse..." or "Choose File" and find the CSV file you created.
2) Select the student identifier you used, whether it is student number or username. 3) Select the course to import into:
- Be sure to select the right course to import, since the list may not have your desired course selected by default.
4) If you would like to update your current group list in iPeer (eg. remove group members not in your new list and enrol new group members in your list), check off "Update Groups".
- If you prefer to only add the new group members from your new list and not remove group members that are not in your new list, don't check off "Update Groups".
5) Click the button below to create the Groups:
- After you are sure everything is set up correctly, click on import. This will process the file, and take you to the group listing for your course. The group creation process is now complete.
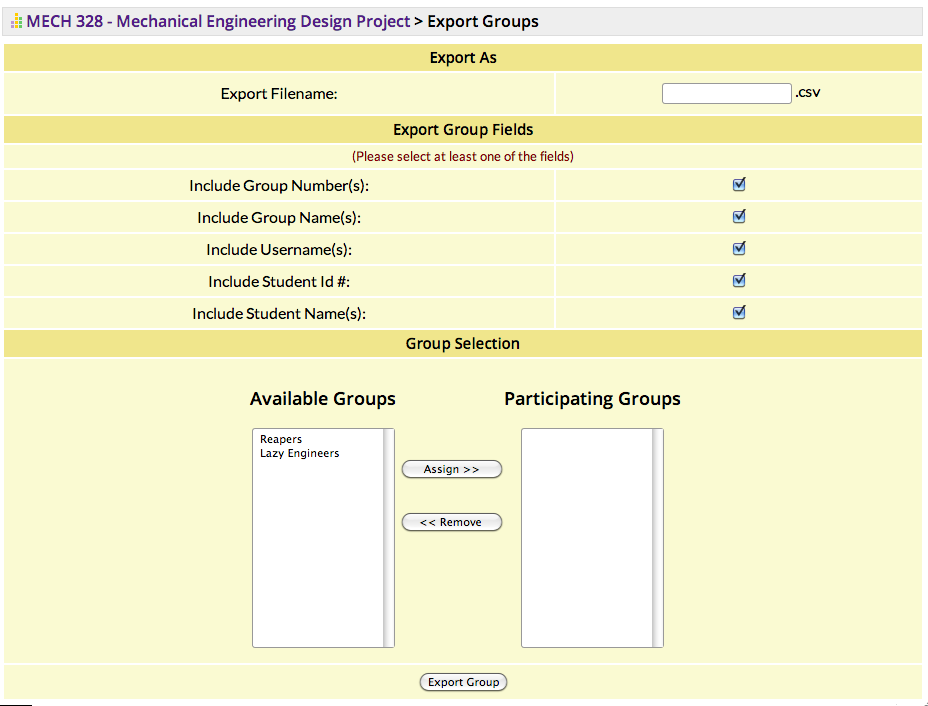
Exporting group list to CSV file

To export groups:
- Go to a course's home page.
- Click on "Export Groups".
All you need to do now is to fill out the form for exporting the groups:
1) Export as:
- Fill in the desired name for the file.
2) Export Group Fields:
- Check the desired fields. A minimum of one field must be left checked.
3) Group Selection:
- Select the groups you want to export from the Available Groups.
- Click on Assign.
- To select multiple groups hold on the Shift, Command, or Control key.
4) Click on Export Group.
Evaluations
Evaluations can be created at any time in iPeer. There are 3 general types of Evaluations, all have their benefits and drawbacks.
Simple Evaluations
Simple evaluations let a student distribute a set number of points among her or his teammates, and comment on their score for each teammate. See the screen shot to the left.
This type of evaluation is the easiest to set up by instructors and do by students, taking the least time. However, it rates students as a whole, and does not ask specific questions about their team contributions.
To create a simple evaluation:
- Click on the Evaluation tab, then, on the top of the "My Simple Evaluation" section, the Add Simple Evaluation link.
- On this form, please enter
- Evaluation Name (required)
- Description (optional)
- Base Point Per Member - recommended values are between 10 and 100.
- Availability - Choose public to share the template with other instructors. If you do not want to share it, choose private.
- Click "Save" button to create the evaluation
Remember to create an "Evaluation Event" when you are done! Otherwise your students won't see your evaluation.
You can create as many "evaluation events" for your Evaluation as you like (for example, one event for each class assignment in your class).
Read about Evaluation Events here.
Rubric Evaluations
To create a Rubric evaluation:
- Click on the Evaluation tab, then, on the top of the "My Rubrics Evaluation" section the Add Rubric link.
- There are 2 parts to the Rubric Add form. On this part, please enter:
- Evaluation Name (required)
- Levels Of Mastery (LOM):
- This sets the number of performance levels for students in each category. For example:
- 3 LOMs would mean a student could have been { Poor, Average, Good }
- 5 LOMs would mean a student could have been { Very Poor, Poor, Average, Good, Very Good}.
- Number of Criteria - the number of aspects to rate the student by, so for example:
- "Participated in meetings", "Handed in work on time", "Co-operated with team" would make 3 criteria.
- Availability - Choose public to share the template with other instructors. If you do not want to share it, choose private.
- Click "Next" to proceed to the next form. In this screen, you will choose the categories, and the performance levels (Levels of Mastery).
- You will see a rubric preview:
- If you wish, fill in or change any LOM General comments on the top row of the preview (like poor, average, good, etc...) The students will see these LOM's in the same way when evaluating their team members.
- Fill in or Change any Criteria in the first column (eg. "Participated in Team Meetings", "Was Helpful and Co-operative", etc...). These are the categories the students will rate each other on.
- When you are done, click the "Save" button, near the top of the page. This will add the rubric to your list!
Remember to create an "Evaluation Event" when you are done! Otherwise your students won't see your evaluation.
You can create as many "evaluation events" for your Evaluation as you like (for example, one event for each class assignment in your class).
Read about Evaluation Events here.
Mixed Evaluations
To create a Mixed Evaluation:
- Click on the Evaluation tab, then, on the top of the "My Mixed Evaluation" section the Add Mixed Evaluaton link.
- On this form, please enter
- Evaluation Name (required)
- Availability - Choose public to share the template with other instructors. If you do not want to share it, choose private.
- Zero Mark - check to start marks from zero for all Likert questions
- Add questions to the template. Choose a question type from the drop down menu and press Add.
- Enter your question.
- Enter the instructions (optional).
- Choose to whether to make the question required.
- For Lickert Questions, enter the maximum mark and descriptors
- After you are finished creating the evaluation, should click the "Save" button, at the bottom of the page.
Remember to create an "Evaluation Event" when you are done! Otherwise your students won't see your evaluation.
You can create as many "evaluation events" for your Evaluation as you like (for example, one event for each class assignment in your class).
Read about Evaluation Events below.
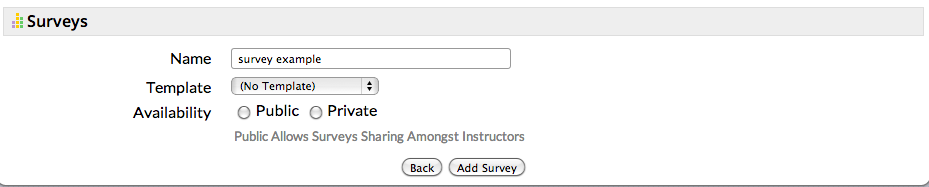
Surveys
Surveys can be created to help generate groups using TeamMaker within iPeer.
To create a Survey Template:


- Click on the Evaluation tab, then, on the top of the "My Surveys" section the Add Survey link.
- Fill out the desired survey template name and choose a survey template. If you want to create your own survey questions, select "(No Template)".
- Choose the availability of the survey template. Choose public to share the template with other instructors. If you do not want to share it, choose private.
- Select Add Survey. You will be redirected to the list of available surveys.
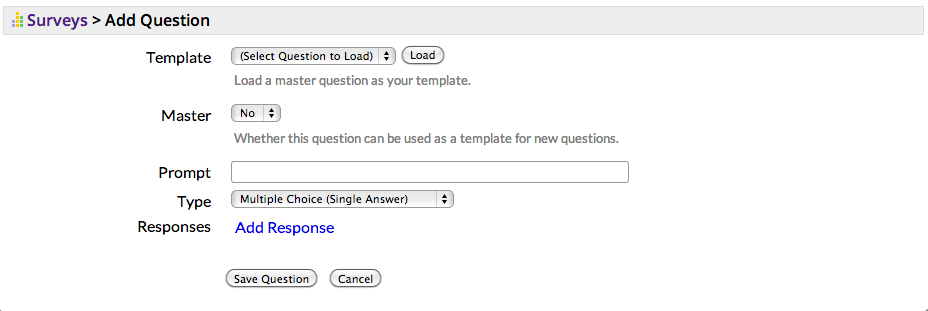
- Select your survey by clicking on the yellow area around your survey name.
- Select Edit Questions.
- Select Add Question.
- Fill out the form. The Question Types available are Multiple Choice, Choose Any of... (multiple answers), short answer, and long answer.
- Repeat Steps 7 and 8 for all your questions.
- You can choose to use questions shared by other instructors by selecting the question from the Template drop down menu and clicking Load.
- Select Finish.
Remember to create an "Evaluation Event" when you are done! Otherwise your students won't see your survey.
You can create as many "evaluation events" for your Survey as you like.
Read about Evaluation Events below.
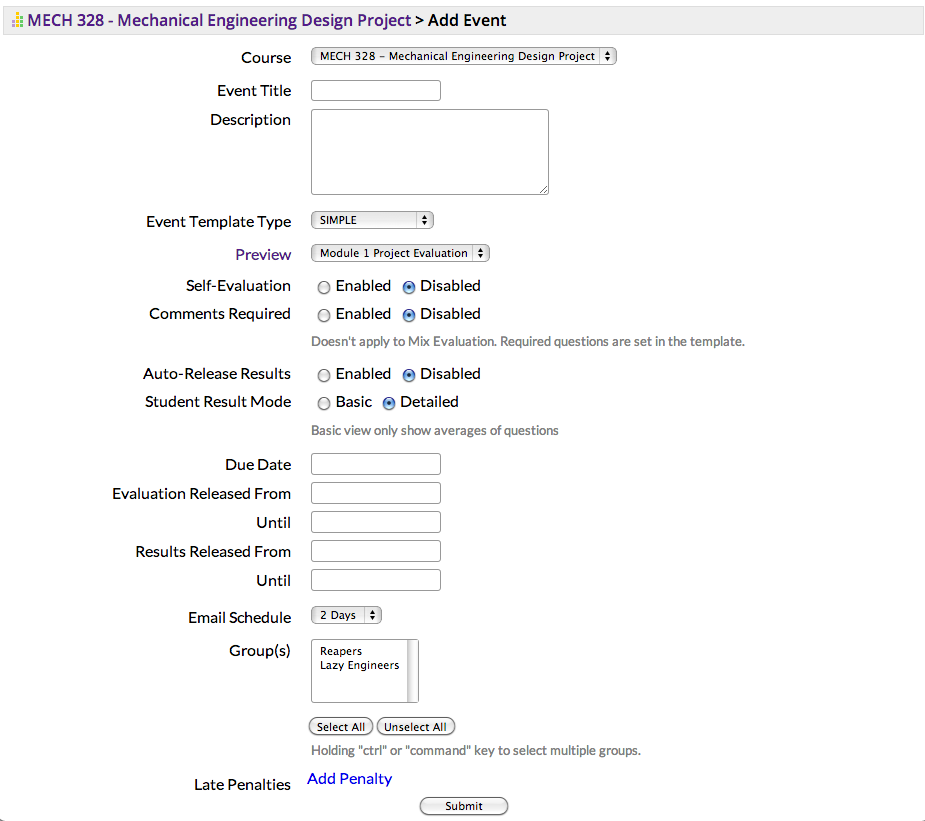
Events
 Before an evaluation can be taken, an evaluation event is added.
An evaluation event includes the following information:
- Which type (Simple, Rubric, Survey, or Mix Evaluation)
- Which specific evaluation.
- The time window when the evaluation can be submitted.
- The time window when the evaluation results can be viewed.
- The due date for the event.
- (although students can still submit after the due date, their submissions are marked "late").
- Whether students are required to complete written comments on evaluations, or if the comments are optional.
- Whether students should evaluate themselves along with the rest of their team.
- Whether results should be auto-released.
- Whether to show a basic or detailed view of the evaluation results.
- Whether to set email reminders for submitting evaluations.
- Whether a penalty is given for late submissions.
You can create as many evaluation events for each evaluation as you'd like. This is like having the same, consistent evaluation for many assignments in your class.

To create an Evaluation Event:
- Go to a course's home page.
- Click on "Add Event".
- Fill in:
- Event title and Event Description
- Evaluation format and name:
- Select the format of your created evaluation
- After, select the Name of the template for this event.
- Select Enabled/Disabled for Self-Evaluation
- Select Enabled/Disabled for Comments Requirement.
- Select Enabled/Disabled for Auto-releasing evaluation results.
- Select Basic/Detailed for the Student Evaluation Results View. (Basic View only contains averages).
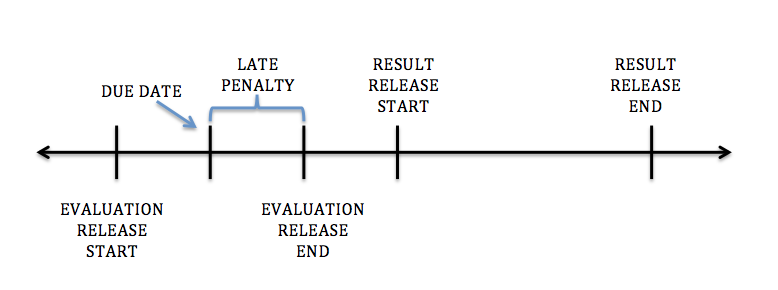
- The Due date - all evaluation submitted after this date will be marked late. (this date must be between Release FROM and TO dates)
- Select the start and end dates for this event. Clicking on the text field opens a calendar allowing you to select the date
- Select the dates for releasing results.
- refer to the timeline on the left, for a clearer idea what each date refers to.
- Select the number of days interval between each email reminder. The first email is sent at the event's start date. If you do not want email reminders, select Disable.
- If the release period of the event is shorter than the interval for the email reminder, only one email would be sent at the event's start date.
- Unsent emails can be deleted by editing the event and disabling the email reminders.
- Email reminder intervals can be changed. If the change is made after the start date of the event, the new email interval would begin from the moment the event is edited.
- Emails would only be sent to participants of the events that have not submitted the evaluation or survey.
- Select the groups you want to complete the event.
- To add penalty for late submission click on Add Penalty. Each time you click on Add Penalty, you can fill out how much to penalize for a specific number of days late.
- Example: 2 days 10% deducted
A single evaluation can be completed many times, and the results of each event are saved in iPeer.
Evaluation Results
When students submit their evaluations, the instructors can view the results. This can be done at any time after the release date, even if only some results are in.
Viewing
To view the results of an evaluation:
- Go to your course's homepage. This can be done by
- Clicking on the Courses Tab.
- Finding your course, and clicking on its title.
- On the Home page, look for the section called "Evaluation Events".
- Click "List Evaluation Events". A list of the evaluation events for the course will show up.
- Find the evaluation of interest, and click on "Results" under "View" column. A list of all the groups will show up.
- Now, by clicking on the links under the "Late?" column to see which group members submitted their evaluation and when. To see the evaluation results, click on "Results" under "View" column. The results will look different depending on which type of evaluation this is.
- Simple Evaluations - shows the individual and average scores for all students in the group in a table near the top. Comments are shown below as well.
- Rubric Evaluations - has 2 views: Basic and Detail (select between them by clicking the small (Basic | Detail) on the upper left corner.
- Basic - Shows the averages for all group members.
- Detail - Shows detailed rating in each category, as well as evaluation comments. Just click on each student's name to show the evaluation scores and comments, just like how the students entered them.
- Mixed Evaluations - also has the Basic and Detailed view.
- Basic - view is just like the rubric above, summaries of points-based questions
- Detail - contains comments for all short and long questions, and grades for the points-based questions.
- Students that have not submitted will be in red and Students that are no longer in the group but has evaluated or were evaluated will be in blue.
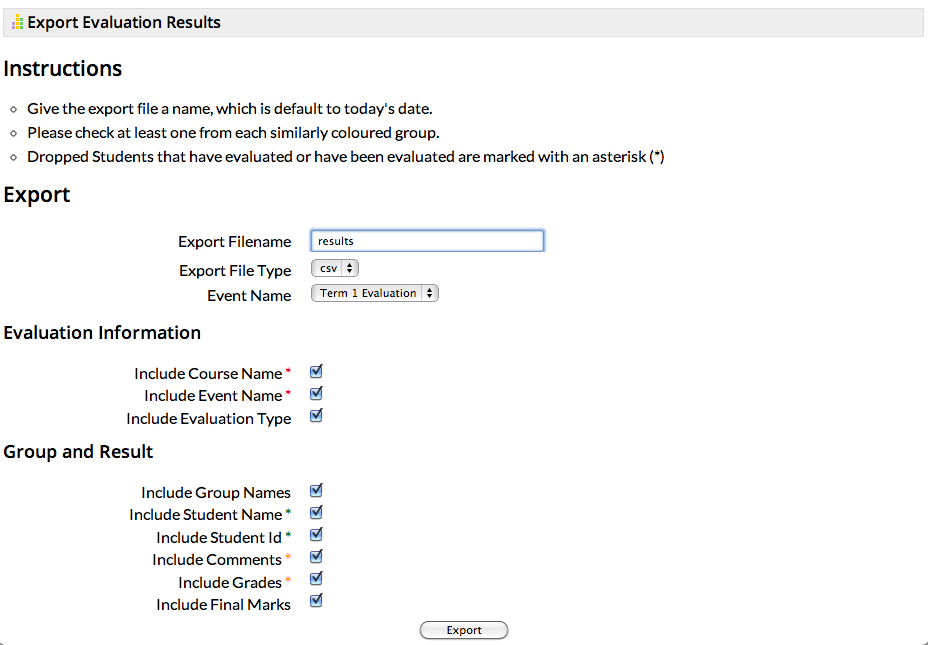
Exporting to CSV/PDF file
 Evaluation Results can be exported to CSV and PDF files.
- Go to your course's home page.
- Click on the Courses Tab.
- Find your course, and click on its title.
- Look for the section called "Evaluation Events".
- Go to "Export Evaluation Results" with one of the methods below:
- Click "Export Evaluation Results".
- Click "List Evaluation Events".
- Find the evaluation of interest, and click on "Results" under "View" column. A list of all the groups will show up.
- On the top left corner, select "Export Evaluations".
- Fill in the form.
- Fill in your desired file name. Default: the date
- Select the desired file type between csv and pdf.
- Select the desired evaluation event.
- Uncheck the details that are not wanted. Note: Leave at least one field of each detail group (marked with similarly coloured *) checked.
- Select Export.
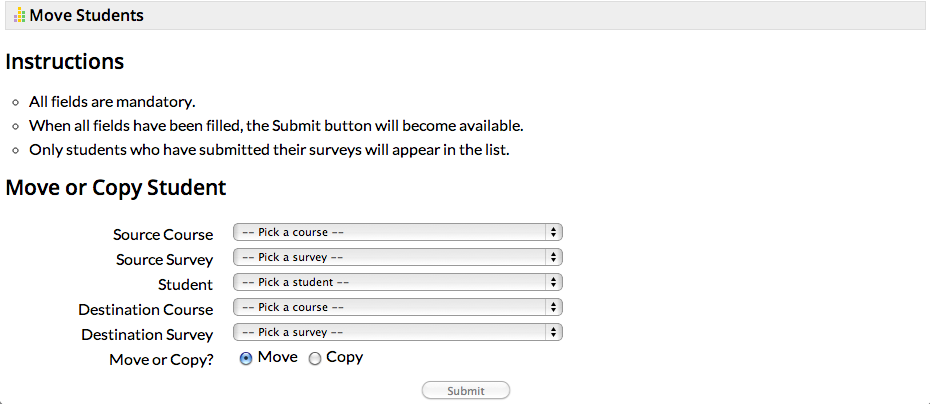
Moving Students
Instructors can now move students from one course to another along with their surveys submissions. For example, instructors can move a student from one section of a course to another.
Moving Students one by one
 Only students that have submitted surveys can be moved using this method. If the student did no submit a survey you can choose to unenrol them from the source course and enrol them in the destination course manually or use the import method explained in the next section.
- Go to your course's homepage.
- Clicking on the Courses Tab.
- Clicking on the course's name or title.
- On the Home page, look for the section called "Evaluation Events".
- Click "Move Students".
- The conditions listed near the top must be met for the move to be successful. Most of them relates to the notes listed in the steps below.
- Select the course the student is currently in.
- Select the survey you want to move along with the student.
- Pick the student you want to move.
- Only students that have submitted the survey selected in step 5 (Source Survey) will appear.
- Pick the course the student is going to.
- Only courses you have access to AND have a survey that uses the same template as the survey selected in step 5 (Source Survey) will appear.
- Pick the survey you want to store the student's submission.
- Only surveys in the course selected in step 7 (Destination Course) that uses the same template as the survey selected in step 5 (Source Survey) will appear.
- Choose Move or Copy.
- Move will unenroll the student from the source course. Copy will keep the student and their survey in the source course.
- Click Submit.
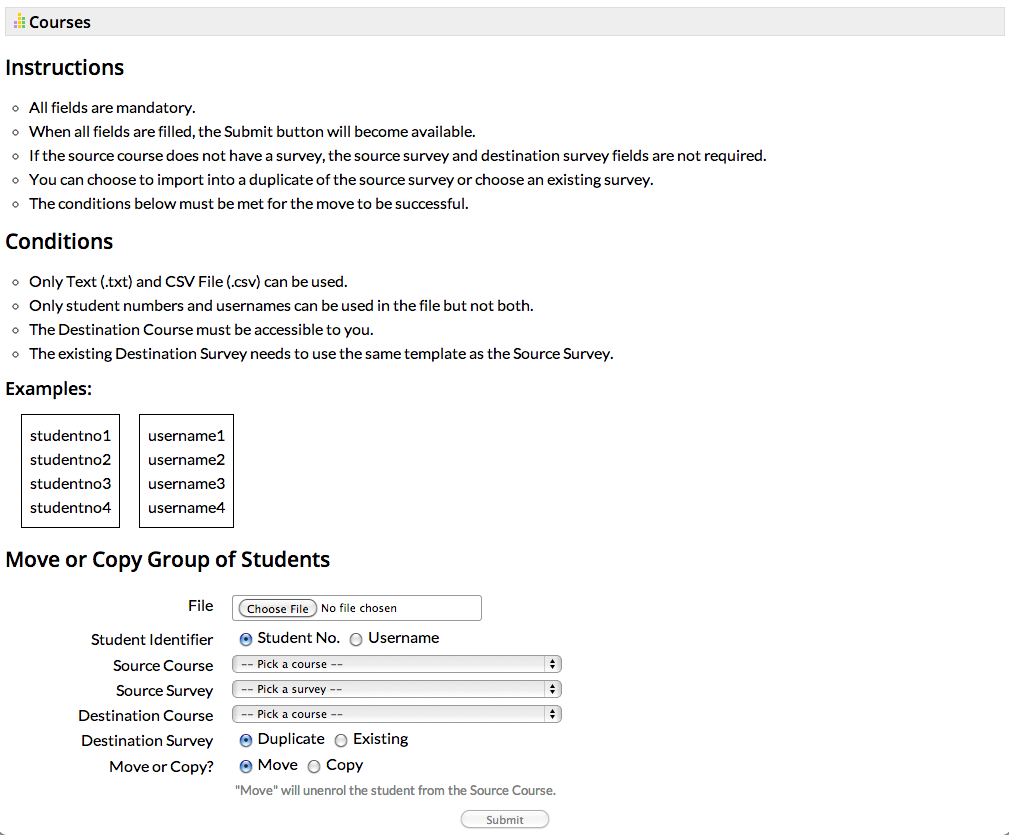
Moving a Group of Students

- Go to your course's homepage.
- Clicking on the Courses Tab.
- Clicking on the course's name or title.
- On the Home page, look for the section called "Evaluation Events".
- Click "Move Group of Students".
- The conditions listed near the top must be met for the move to be successful. Most of them relates to the notes listed in the steps below.
- Import a file with a list of student identifiers which includes student numbers or usernames but not both. The format should be like the examples below the instructions.
- The file must be in a CSV (.csv) or Text (.txt) format.
- Pick the student identifier used.
- The valid identifiers are student numbers and usernames.
- Pick the course where the students are coming from. If the course does not have a survey, skip steps 8 and 10.
- Pick the survey to move along with the students.
- Pick the course the students are going to.
- Only courses you have access to will appear.
- Choose to duplicate the source survey into the destination survey or using a survey that already exists in the destination course.
- If you choose to use an existing survey, select the survey from the dropdown menu that appears. Only surveys that use the same template as the survey selected in step 7 (Source Survey) will appear.
- If you choose to duplicate the source survey, a copy of the survey selected in step 7 (Source Survey) will be created.
- Choose Move or Copy.
- Move will unenroll the student from the source course. Copy will keep the student and their survey in the source course.
- Click Submit.
Administrators
Administrators form the smallest user group. An administrator has instructor capabilities (see above) for all courses and users. The administrator also has the privilege to delete information, which can cause data inconsistency. There are faculty admin accounts available which allows the user to have admin access to all the courses in the departments within their faculty. There is also a super admin account that is used for administration of all users including administrators. Administrators should be extremely cautious when removing data as it is very easy to cause database inconsistencies.
- For example, to remove a student that has been enrolled in a course, and has taken evaluations will likely cause errors when those evaluations are viewed. It is best to leave old users in the database.
Account Consolidation
Administrators can now consolidate accounts together.
- Click on the Users Tab.
- Click on Merge Users.
- Search for the primary account and secondary account by full name, username, or student number.
- Select the two accounts you want to consolidate. The primary account is the account you want to keep. On the contrary, the secondary account is the one that would be deleted and have their data transferred to the primary account.
- The two accounts must have the same role.
- The secondary account cannot be the currently logged in user.
- Verify the two accounts' user data.
- Note: the merger cannot be reversed.
- Click merge.
Permissions Editor
Super Administrators can change permission levels for different roles in the application.
- Click on the Admin Tab.
- Click on Permissions Editor.
- Search for the permissions you wanted to modify.
- Click on the permission.
- Choose the modification you wanted.
Google Analytics
Super Administrators can also enable Google Analytics in iPeer.
- Go to Google Analytics to sign up for an account.
- Choose between Universal Analytics and Classic Analytics.
- When you reach the tracking code section, copy down the following information from the line of code below.
- Universal Analytics
- tracking id (eg. UA-xxxxxx-x)
- domain (eg. ubc.ca)
ga('create', 'UA-xxxxxx-x', 'ubc.ca');
- Classic Analytics
- tracking id (eg. UA-xxxxxx-x)
_gaq.push(['_setAccount', 'UA-xxxxxx-x']);
- tracking id (eg. UA-xxxxxx-x)
- Universal Analytics
- Log in to iPeer. Click on the Admin Tab.
- Click on System Parameters.
- Click on the system parameter with the code 'google_analytics.tracking_id'
- Choose Edit.
- Fill in the tracking id provided by Google Analytics into the Parameter Value field.
- Click Save.
- If you choose to use Universal Analytics, repeat steps 6 to 9 for system parameter 'google_analytics.domain' and the domain you copied.
Custom Logo
Super Administrators can add a custom logo (eg. the institution's logo) to the right side of the application's header.
- The custom logo can be hosted with the iPeer application or on another server.
- If the logo is to be hosted with iPeer, place it in (iPeer root)/app/webroot/img/layout/
- If the logo is hosted on another server take note of its url.
- Log in to iPeer. Click on the Admin Tab.
- Click on System Parameters.
- Click on the system parameter with the code 'banner.custom_logo'
- Choose Edit.
- Fill in the location of the logo into the Parameter Value field.
- If the logo is hosted with iPeer, enter the logo's file name. (eg. ubc.png)
- If the logo is hosted elsewhere, enter the logo's url. Please include http:// or https://. (eg. http://www.ubc.ca/ubc.png)
- Click Save.
Time Zone
Super Administrators can furthermore change the time zone iPeer uses.
- Log in to iPeer. Click on the Admin Tab.
- Click on System Parameters.
- Click on the system parameter with the code 'system.timezone'
- Choose Edit.
- Fill in the desired timezone from the list of Supported Time Zones.
- Try to avoid any of the time zones listed in the 'Others' category (besides UTC).
- Click Save.
FAQs
Icons
Below is a description of the icons that are used in the iPeer web application.
 Add an entry
 Edit an entry
 Delete an entry
 View an entry
 Course Homepage
 Export evaluation results
 Merge users


Glossary
Evaluation Event: An evaluation task which is assigned to specific groups of students. An evaluation event must also have an evaluation format, release time (starting and end), result release time, and due date.
Evaluation format: Methods for members of a group to evaluate other members (and possibly themselves).
Rubric evaluation: An evaluation format where a matrix is used to rate students according to different levels of mastery (e.g. poor, satisfactory, excellent). Students assess their team members' contributions through answering multiple choice type questions and providing written comments if desired.
Simple Evaluation: An evaluation format where members rate other members (possibly themselves) by allocating to each member a portion of a possible mark total (conceptually dividing up money among group members).
Mixed Evaluation: An evaluation format where members rate other members (possibly themselves) by answering questions of different types such as Likert (rubric-like), Score Dropdown (simple evaluation like), short answers, and paragraph answers.
Attachments (25)
-
studentSimpleEval.png
(83.1 KB
) - added by 12 years ago.
Student View of Simple Evaluation
-
studentRubricEval.png
(135.4 KB
) - added by 12 years ago.
Student View of Rubric Evaluation
-
studentMixedEval.png
(125.9 KB
) - added by 12 years ago.
Student View of Mixed Evaluation
-
courseIndex.png
(65.3 KB
) - added by 12 years ago.
course index
-
addCourse.png
(42.6 KB
) - added by 12 years ago.
add course form
-
importedStudents.png
(44.4 KB
) - added by 12 years ago.
imported students
-
importClassList.png
(91.7 KB
) - added by 12 years ago.
import class list
-
exportGroups.png
(51.9 KB
) - added by 12 years ago.
export groups
-
addSurvey.png
(22.5 KB
) - added by 12 years ago.
add survey
-
addQuestion.png
(34.7 KB
) - added by 12 years ago.
add survey question
-
addEvent.png
(76.4 KB
) - added by 12 years ago.
add event
-
eventTimeline.png
(20.3 KB
) - added by 12 years ago.
event timeline
-
exportResults.png
(57.0 KB
) - added by 12 years ago.
export results
-
icons.png
(83.1 KB
) - added by 12 years ago.
icons
-
moveGroupOfStudents.2.png
(46.6 KB
) - added by 12 years ago.
move group of students
-
moveStudent.png
(62.3 KB
) - added by 12 years ago.
move student
-
addGroup.png
(53.7 KB
) - added by 12 years ago.
add group
-
add.gif
(594 bytes
) - added by 12 years ago.
add icon
-
edit.gif
(390 bytes
) - added by 12 years ago.
edit icon
-
home.gif
(162 bytes
) - added by 12 years ago.
course homepage icon
-
export_excel.gif
(402 bytes
) - added by 12 years ago.
export icon
-
merge.png
(445 bytes
) - added by 12 years ago.
merge icon
-
delete.gif
(391 bytes
) - added by 12 years ago.
delete icon
-
view.gif
(636 bytes
) - added by 12 years ago.
view icon
-
moveGroupOfStudents.png
(82.3 KB
) - added by 12 years ago.
move group of students
Download all attachments as: .zip